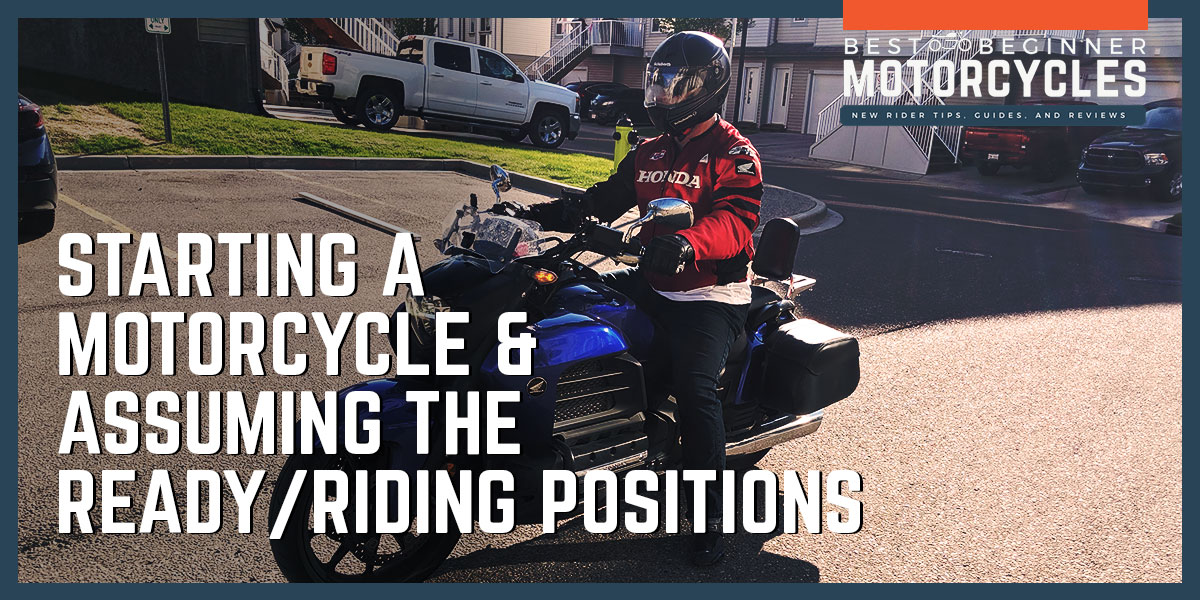
Starting your engine & assuming the ready/riding position… can anyone say “name of my sex tape”. All joking aside, knowing the general rule of thumb for starting a motorcycle and assuming PROPER ready/riding position will potentially save you some headache, embarrassment, injury, and even fatigue while riding.
In this article, I will give you a checklist of steps to go through for starting a motorcycle that can apply to the vast majority of the motorcycles on the market. I will also go in-depth on specific posture/positioning on a motorcycle and why it’s important.
Starting a Motorcycle Using F.I.N.E.C.C.
A friend of mine told me a true story about a guy with a super nice tricked out Harley showing up at a popular motorcycle spot to go for ice cream with some other riding friends. He and his friends parked the bikes and went across the street to get the tasty treat.
As I am sure you can imagine, where there is ice cream there are children around and all the kids always like to go look at all the motorcycles that show up at this location, and unfortunately, some of the children like to touch the motorcycles and play with switches.
On this particular occasion, the person with the Harley had his engine kill switched from on to off. When he and his friends were ready to leave, he tried to start his bike, but because the engine kill switch was turned off all the lights were on but nobody was home and the engine wouldn’t turn over.
This friend of mine was watching what was happening with the guy (now panicking that something was wrong with his bike) went over and flipped the switch for the poor guy. The Harley rider was embarrassed and grateful nothing was wrong, but I imagine his ride home was a bit of a quiet one.
The moral of the story is: if you follow the steps below for starting a motorcycle, you can avoid potential embarrassment or frustration due to unforeseen circumstances (or a simple brain fart).
“F” Fuel
Making sure you have fuel is the first thing you should do every time you leave especially if you have bad filling habits or if it has been a while since you have ridden.
Many motorcycles, especially older ones, don’t actually have a fuel gauge/low fuel light, and the ones that do have these features don’t always work. When checking your fuel, it’s a good idea to actually open up the fuel cap and take a look at how much gas you have.
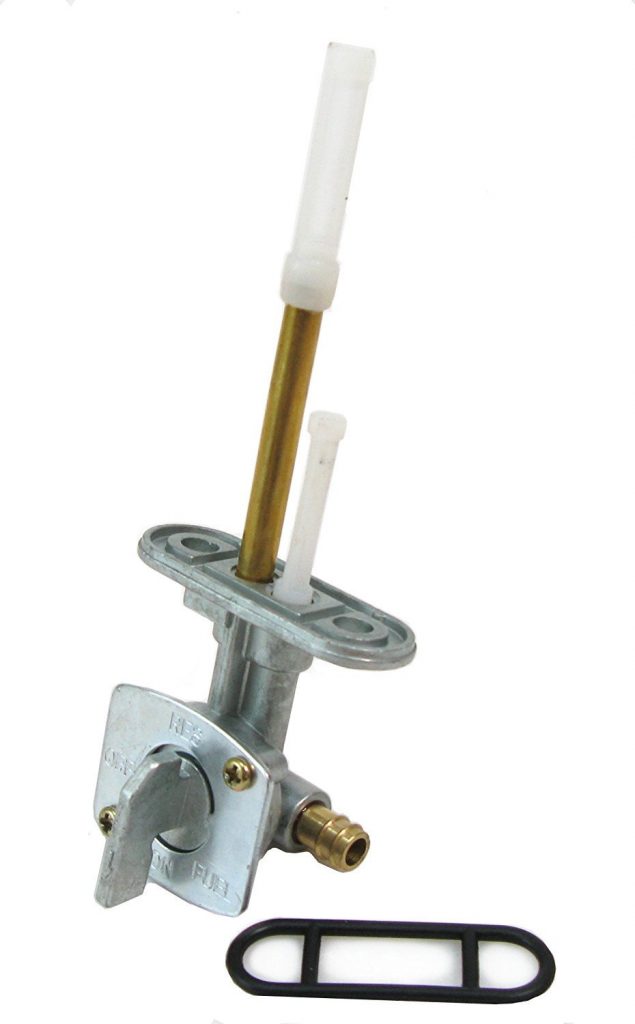
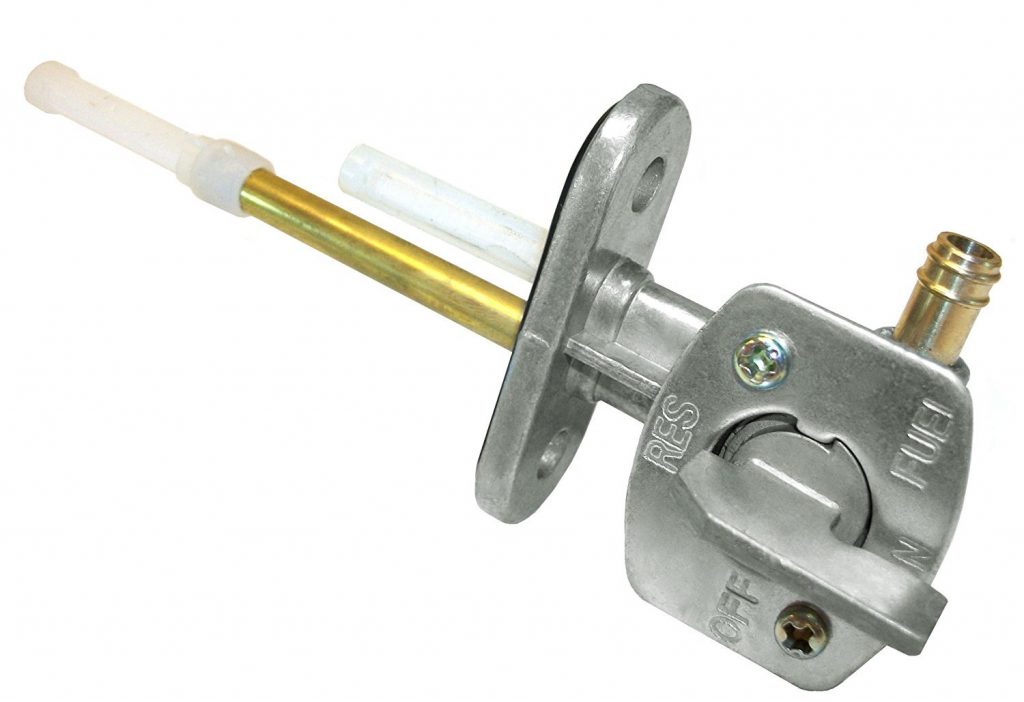
The other thing that you want to check is the “fuel petcock/valve”. This valve is used to control the flow of fuel from the gas tank to the motor and is typically found on older carbureted motorcycles, but it is possible for a newer fuel injected bike to just have an on/off valve so double check your owners manual.
Most fuel injected bikes don’t have a valve, the fuel control is done by the electronics of the motorcycle. The petcock/valve will have 3 or all 4 of the options listed below.
OFF: Off is pretty self-explanatory, when the valve in the Off position, no fuel is able to get to the motor. The valve should be in the off position whenever the motorcycle isn’t in use.
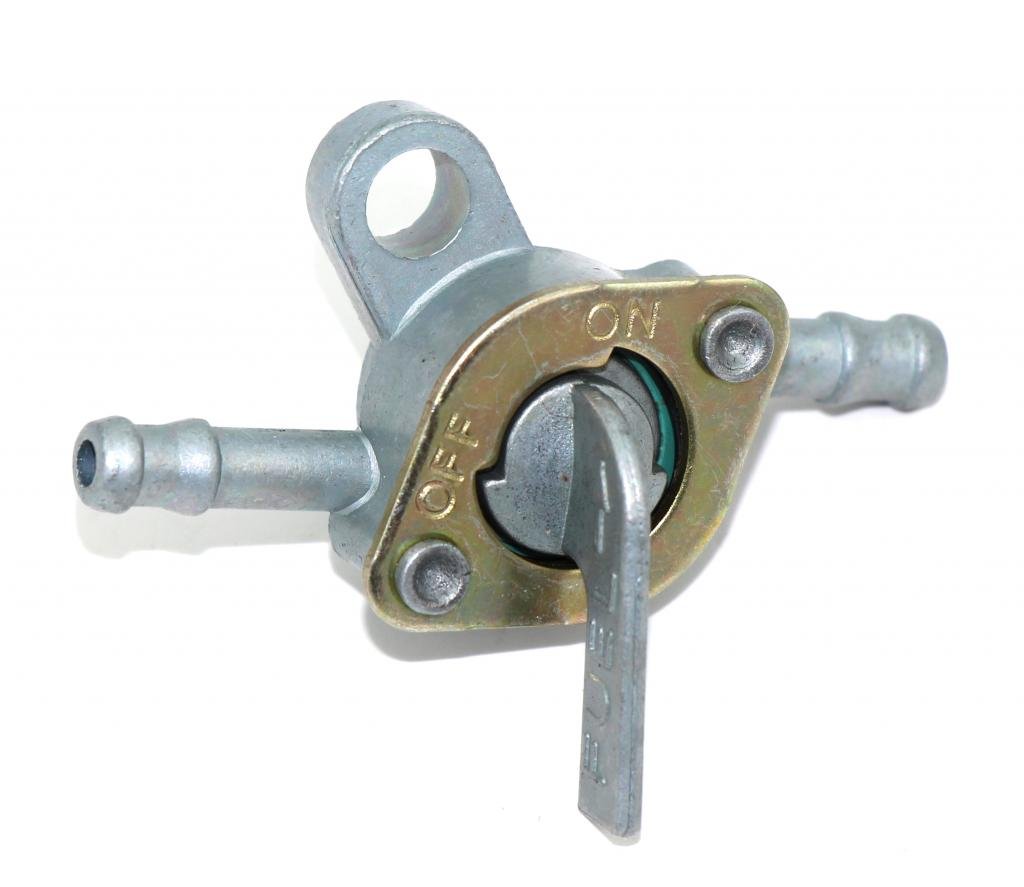
ON: Allows fuel to be delivered from the primary/upper portion of the fuel tank to the motor: Valve should be in the ON position when the motorcycle is being used.
- RES “RESERVE”: Allow fuel to be delivered from a secondary/lower portion of the fuel tank. This position should only be used temporarily when you no longer have enough fuel to use the ON position.
- PRIM “ PRIME”: This position allows for fuel to flow into the motor better to make starting the motor easier. Put back into ON or OFF position for any other time.
Important Tips to Not be Stranded
I have done some silly things and have learned from them. Some recommendations to get in the habit of, to avoid needing help on the side of the road due to running out of fuel.
Check the Fuel
Be sure to actually open the gas tank and check how much fuel you have left. Sometimes fuel can slowly leak out from a loose fitting or a mechanical problem. Actually checking to make sure fuel level hasn’t dropped is not only an early indicator of what you need to do for the trip but to prevent potential bigger issues. This is especially true if you follow the next few tips.
Fill Up Your Bike on the Way Home
I know a lot of the time when riding especially long rides, you just want to get home. But I recommend getting into the habit of filling your bike on the way home. This will ensure you have a usable reference point when checking the bike in the morning and if you are running behind you don’t have to worry about running out.
Be Familiar With the Fuel Petcock/Valve
… if your bike has one, anyway. From the riding position, you will want to be familiar with where the valve is on the motorcycle and the positions of the “ON” and “RES”. The petcock is your low fuel indicator and may need to be adjusted while riding.
Reset the Petcock (if Applicable)
Put the petcock back into the “ON” position after filling the motorcycle if you had to change to the reserve tank.
Petcock Off
When parking your motorcycle it is a good idea to put the fuel valve back into the off position. Some motorcycles don’t have an off position if this is the case leave the valve in the “PM” position for storage.
“I” Ignition
“Not to be confused as the starter”
The ignition is what engages the electrical system on a motorcycle. The Ignition/power delivery control can vary from simple “no key” push-button systems to really cool and unnecessary proximity/remote keys. What you will see on a more than a significant amount of street motorcycles, is a variation of a key and ignition switch – also known as “cylinder lock”.
This ignition switch typically can have up to 4 options on them, “LOCK, OFF, ON, ACC” if there are more options then it is usually an exception to the rule and should refer to your owners manual.
- LOCK: Not all bikes have this option, but if they do, putting your key in the lock position will prevent your front wheel from turning out of the park position (wheel turning into the kickstand), making it incredibly difficult for evil dastardly people to steal your baby away from you.
- OFF: When the key is in the OFF position, the motorcycle does not have any electrical power being delivered to the motorcycle. No components will be able to drain your battery.
- ACC “ACCESSORIES”: Not all motorcycles will have this option. If it does when the key is in this position, though, you will have battery power to your accessories like lights, radio, and heated hand grips, but will not be able to start the motorcycle.
- ON: With the key in this position the battery will be able to deliver power to all the electronics on the motorcycle including being able to start the motorcycle.
These Ignition switches can actually be located ANYWHERE on your motorcycle but manufacturers typically put them in 1 of these 3 places:
- In front of your speedometer on your hand grips.
- On your gas tank.
- On your left-hand side underneath the motor (can sometimes also be on the right)
“N” Neutral
Anyone who drives or has driven anything with a motor should know what neutral means but just in case. Neutral is the gear position or notch that doesn’t allow the motor to transfer its power to the wheels regardless of the clutch lever position.
Some motorcycles require you be in neutral before it will let you start the motorcycle, but for most it is just highly recommended. Having the motorcycle in neutral can make it easier on the motorcycle to start and prevents the possibility of an incident due to an accidental release of control levers.
How to Get into Neutral
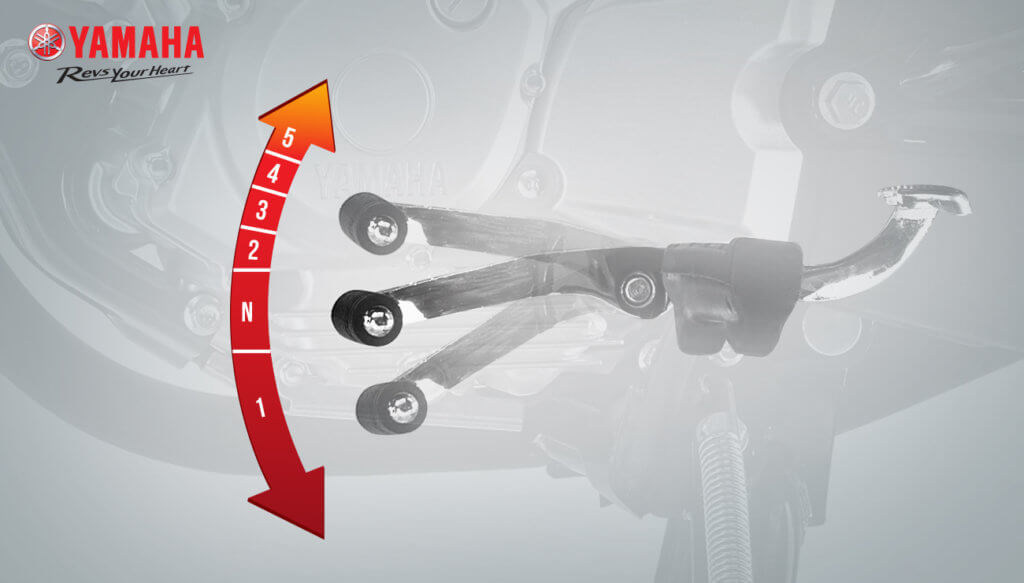 Image from Yamaha UK
Getting into neutral on a motorcycle can sometimes be a challenge for new riders because of the position of the neutral gear. Neutral is found sequentially between 1st and 2nd gear or a ½ click between 1st and 2nd gear. This means that you can go from:
- First gear to Neutral – What will be done most often when stopped
- First gear to Second – Used when actually riding the bike and speeding up
- Second gear to Neutral – Not used often, Usually used when accidentally going up to second gear from first when trying to get neutral
- Second gear to First – When slowing down to stop at a light but stay in gear to be ready to leave again
Some motorcycles can even exhibit a little bit of a personality when trying to find neutral and take a little extra finesse to get used to.
False Neutral
A false neutral is when the neutral indicator is triggered “typically a green light with an (N) on it” and also known as a dummy light (in red), is lit up, but the bike is actually still in gear or is on the verge of falling into gear due to not being previously fully engaged in a position.
 Neutral light on a 2020 Yamaha R6
This phenomenon can happen on new and old bikes alike so be sure not to rely on just the (N) light. A few ways you can make sure you are actually in the neutral position on your shifter is to.
- When your bike is not running: Make sure the clutch is released and you roll your motorcycle a few inches forward and back. If you don’t have any transmission resistance it is more than likely you are in neutral.
- When the motorcycle is running: It is assumed that you would have the clutch pulled in at this point as you would have just switched gear into neutral. To make sure you don’t accidentally cause any issues, be sure to let the clutch out extremely slowly to be sure the gear is actually in the neutral position.
Note: It should be mentioned that it is possible to get caught between gears such as 2>3>4>5 and vice versa but is extremely unlikely to happen on a well-maintained motorcycle.
“E” Engine/Emergency Kill Switch
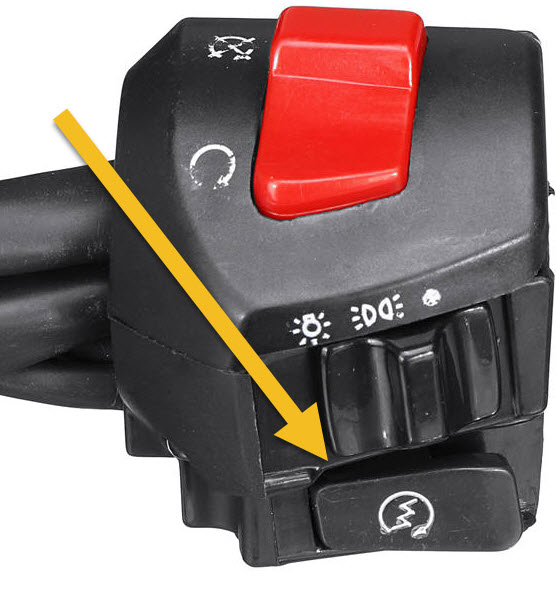
The Engine or Emergency Kill switch is a secondary switch after the ignition to allow power to the engine itself. When the switch is in the position of the semi-circle with an X over it or simply labeled with off, the Engine will not have power delivered to it.
When the switch is in position with the semi-circle without the X through it or labels on, then the bike will be able to run. This switch is typically found on the electronics control box/module right beside the throttle on the right-hand side.
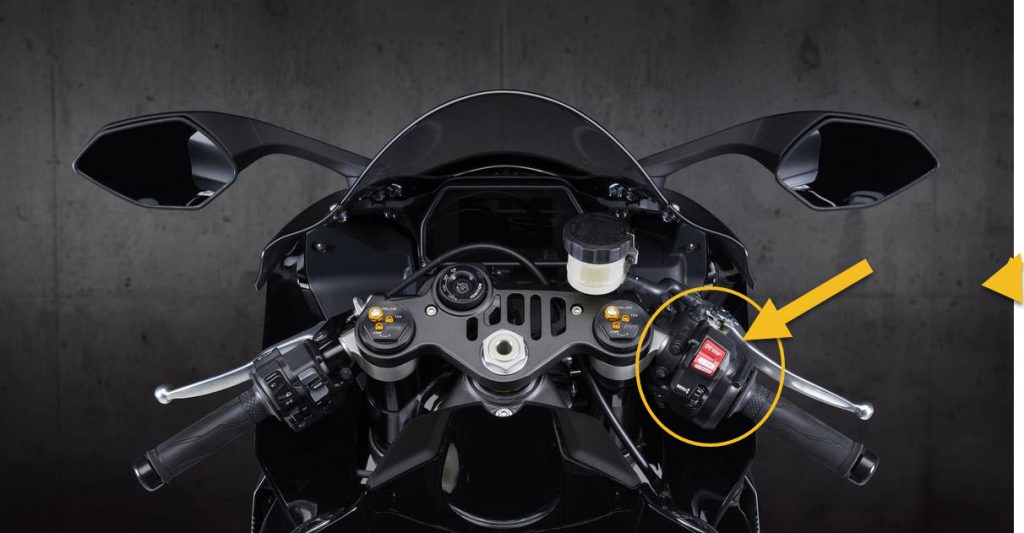 Kill switch on 2020 Yamaha R1
Some motorcycles to opt for what’s called a momentary switch push button. Meaning that the bike always has electrical power going to the motor except for when the button is held down.
You will generally only find this type of kill switch on dirt/off-road bikes and is used so that when going through rough terrain you or the bike don’t accidentally trigger the switch into the off position.
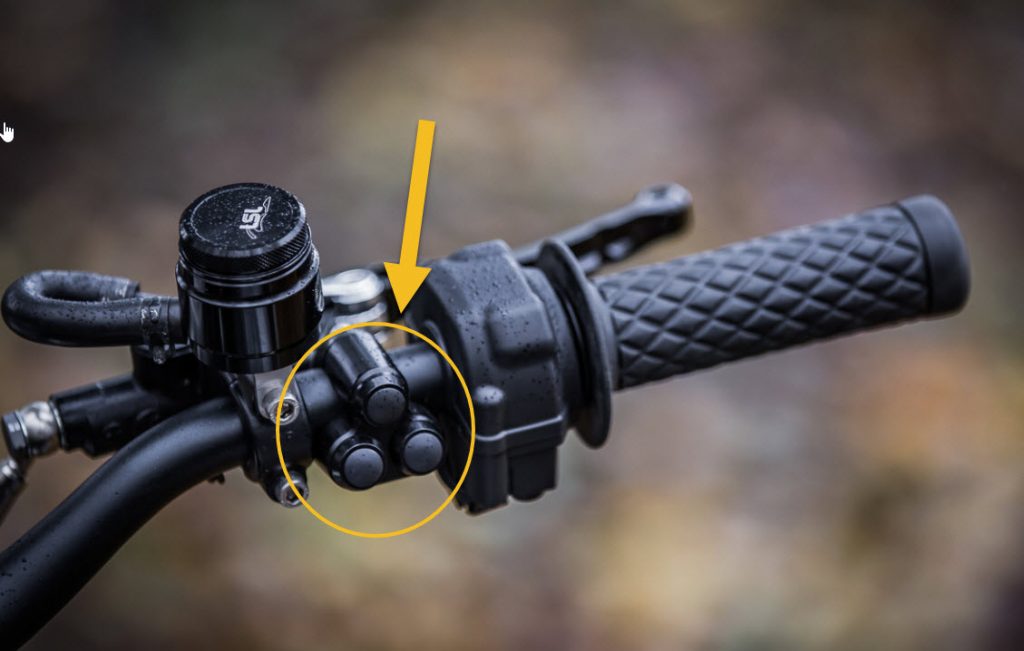 Image from BespokeMotorcycles.co.uk
Using the Engine/emergency kill switch whenever you turn off your bike is a good habit to get into as it allows you to make sure your kill switch is working in the event of an emergency and avoids embarrassment like the story I told at the beginning of the article.
With that being said there are some exceptions to this rule. Some bikes actually use the kill switch as a reset mechanism for the computer settings of the motorcycle so the manufacturer doesn’t recommend using it for that purpose.
Some of the brands I have heard that can have this feature are BMW, Triumph, and KTM but could potentially become more popular so double check your owners manual to make sure if this applies to you and your bike.
The First “C” Choke
 Image from BikeBD.com
The choke will only really apply to older carbureted motorcycles and only really used when first starting and warming up the bike before leaving. The choke when enabled allows for richer combustion allowing the motor to run even when it’s cold.
As you can see below there are many different styles and where the choke control can be found so double check your owners manual if you can’t find it.
Every motorcycle is different from how much choke is required and for how long. Some motorcycles, even though they have a choke, don’t even need to use them, where other bikes need to use the choke to warm up the bike for 5-10 minutes with the choke before they are ready to go.
If you are using too much choke you will typically find that the RPM of the Engine is higher than your regular idle, when you hear this change be sure to push the choke back in slowly, and a little bit at a time to make sure you don’t use to little choke while the motorcycle is still warming up.
You will know as well if your motorcycle is ready to go is if you can give a little bit of throttle. While in neutral if you notice the engine struggle to smoothly bring the RPM up then it’s still not warm enough to take out yet.
***NEVER RIDE YOUR MOTORCYCLE WITH THE CHOKE ON***
It can be bad for the carbs and spark plugs, forcing early maintenance and even damage.
The Second “C” Clutch
Applying the clutch is the last step you will need to do before you are ready to start the motorcycle. Applying the clutch before starting is necessary for many bikes but is also a good habit to get into for motorcycles that don’t require it. I suggest this for a few reasons:
- The false neutral as listed above
- You may not be paying attention or may have accidentally left it in gear
- Sometimes it may look like you are in Neutral but once you start the bike the little extra movement in the engine can incidentally engage a gear
- Further takes the strain off the starter by reducing the engines drag on the system
When you have the motorcycle started and idling smoothly you can slowly release the clutch. Pay particular attention to if the clutch is engaging or if the motorcycles RPM are changing. If the RPM’s do change, you are likely in an actual gear.
Start Your Engine
Now that all of the previous steps have been completed, you are ready to press the start button. The button will be labeled with the word start or have the symbol shown below.
The start button is typically located near the engine kill switch on the right-hand electronics control box/module
Ready Position
The Ready Position is the seated position on the bike you should be in whenever you are ready to leave and whenever you come to a stop. Using this position should give you the most control of the bike and cause the least amount of fatigue when riding.


- Head: When on a motorcycle you want to make sure you keep your head up and looking around you. When you are looking up, you know what and when you should be going. I promise you the controls won’t go anywhere.
- Shoulders: Your shoulders should always be relaxed. If you are tense then even after a short ride you will likely be sore that night or the next day.
- Elbows & Arms: You want to have a bit of a bend in your arms and again should be relaxed. You want to make sure you have some bend in your arms to make sure you have some room for maneuvering the handlebars.
- Wrists: Make sure your wrists are level and straight with the hand grips. Doing so will allow you to have access to the hand controls.
- Fingers: Using all four fingers have the clutch pulled in and your hand on the grip of the throttle. This shows that you are actually ready to go
- Back: Allow your back to arch a little giving it a bit of a curve. RELAX!!!!! – are we noticing a theme?!
- Seat position: Some motorcycles give you some leeway on your seating position. Find a position not too far forward or back that allows for a comfortable upright position. One that won’t make you feel like you’re falling off and reaching, or so far forward you are pushing your sensitive parts uncomfortably up into the gas tank.
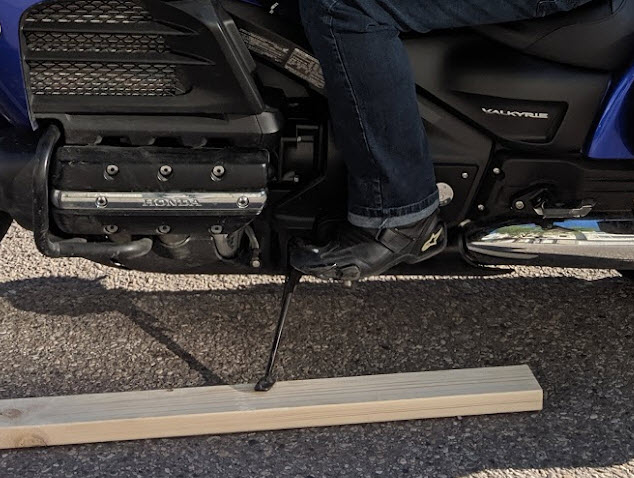
- Knee: Your right knee is pressed up against the gas tank. This promotes having the weight of the bike on the left leg.
- Feet: With having your right knee up against the tank basically also forces you to have your right root up on the peg/applying the rear brake. When stopped you always want to make sure you have your right foot up so you can use the rear brake freely while still having control of the throttle. Your left foot should be firmly planted on the ground beside you with the bike leaning slightly so the weight of the bike is on the left foot.
Riding Position
Much of the riding position is the same as the ready position but with slight differences or purposes. The riding position is the position you should be in any time the motorcycle is moving no matter how fast or slow you are going.


- Head: When on a motorcycle you want to make sure you keep your head up and looking far ahead in the direction you want to go. DON’T LOOK DOWN as best you can. You want to look up and ahead because doing so gives the sensation or feeling that everything is happening slower. This way you can process everything you see and plan to react accordingly. Looking ahead and where you want to go also helps with balancing the bike.
- Shoulders: Your shoulders should always be relaxed. If you are tense, even after a short ride you will likely be sore that night or the next day.
- Elbows & Arms: You want to have a bit of a bend in your arms and again should be relaxed. You want to make sure you have some bend in your arms to make sure you have some room for maneuvering the handlebars.
- Wrists: Make sure your wrists are level and straight with the hand grips. Doing so will allow you to have access to the hand controls
- Fingers: When Riding you should always have your hands on the grips unless actually using the hand controls. Having both hands on the grips promotes control in the event of things like potholes, debris, railroad tracks, loss of traction, etc…
- Back: Allow your back to arch a little giving it a bit of a curve. RELAX!!!!. Allowing for a curved back will naturally absorb impact from the road that the suspension was not able to mitigate. Makes long trips much more manageable.
- Seat position: Some motorcycles give you some leeway on your seating position. Find a position not too far forward or back that allows for a comfortable upright position. One that won’t make you feel like you’re falling off and reaching, or so far forward you are pushing your sensitive parts uncomfortably up into the gas tank.
- Knee: You will want to have both Knees up against the gas tank. Keeping your knees tight to the tank will prevent disruptions in the balance of the bike due to multiple centers of gravity.
- Feet: You will want to have both feet on the pegs but not hovering either of the controls. You can have your heel on the peg and your toes sticking out (I personally don’t like this position on any bike as I would typically scrape my toes going around corners unnecessarily) or put the ball of your foot on the peg and move it to the controls when needed as displayed below.