Video
Why We Do the Pre-Ride Check
Safe riding starts with a steadfast steed. We as motorcycle riders have way too much to think about when on the road and should never have to worry about something not working as intended, in the event we need it to.
I cannot stress enough, how important regular maintenance and pre-ride checks are to any and all riders. Mechanical devices, especially motor vehicles, have wear and tear, meaning all devices will eventually fail. It’s all a matter of you catching and dealing with those worn out parts before it becomes a problem.
On-Hand Prepared
It’s also a good idea to have some tools with you outside on the road in case something happens. Most bikes come with the bare necessities but check “Motorcycle Preparedness: The Importance Of Being Ready For The Road“ out for more details on recommended gear and tools to have on hand.
Planning Ahead
Keeping diligent with pre-ride checks on your bike doesn’t have to be all about safety. Doing your regular checks also allows you to plan/budget for those shiny new replacements or upgrades. No one wants to keep off the road because the bike is down for repairs and you can’t afford to replace it because you weren’t expecting it…
Check the Manual
Every motorcycle is infinitely different from one another. Because of this, it is in your best interest to have at least the owners manual for your motorcycle. It contains good information on how often things SHOULD be replaced but also recommended settings and values.
The owner’s manual is a minimum in my opinion. There are DIY repair manuals from publishers such as Haynes & Clymer that offer so much more information in so much more PICTURE detail and is an invaluable resource when learning about your motorcycle.
Visual vs. Comprehensive Inspection of Your Motorcycle
Visual
Motorcycles are high precision pieces of art, so usually, when something is off, you can often tell by just looking a little closer. Visual inspections are surface level checks that are done with little to no interaction with the motorcycle. IE – are the tires flat, suspension sagging, or is there visible noticeable damage. If something looks wrong then we can delve deeper.
Comprehensive
These pieces of art are comprised of high performance/complex machinery that is constantly affected by time and our use of them on the roads. When doing comprehensive check we are not only checking how things look but checking that they are working and that everything is within the parameters.
Comprehensive checks often require intimate interaction with the motorcycle by taking parts off or out of the bike to confirm the inner components are properly working. Tools are often used when doing comprehensive checks. “I.e. checking all the fluid levels and color(for wear), fasteners, chassis, radiators, hose, etc.”
Full/Pre-Season Checks
I do my preseason checks on my motorcycle about 2 weeks to a month before nice weather is supposed to hit. I perform my check especially early to make sure I have enough time to fix or repair anything major, so I am ready to hit the road when the nice weather hits.
Motorcycles are parked for a good portion of the year, and because of this, we don’t know entirely if anything has changed on the bike so you will want to do a pretty comprehensive checkup on virtually the entire bike.
An easy efficient way to go through your bike is to give it a good cleaning, and as you wash every inch of your bike you can go over a large portion of the checks at that time. Kills two birds with one stone :D.
Wheels
Tires
There are many styles and sizes of motorcycle tires but checking them is universal. Here is a list of things to look out for when checking to see if your tires are still good.
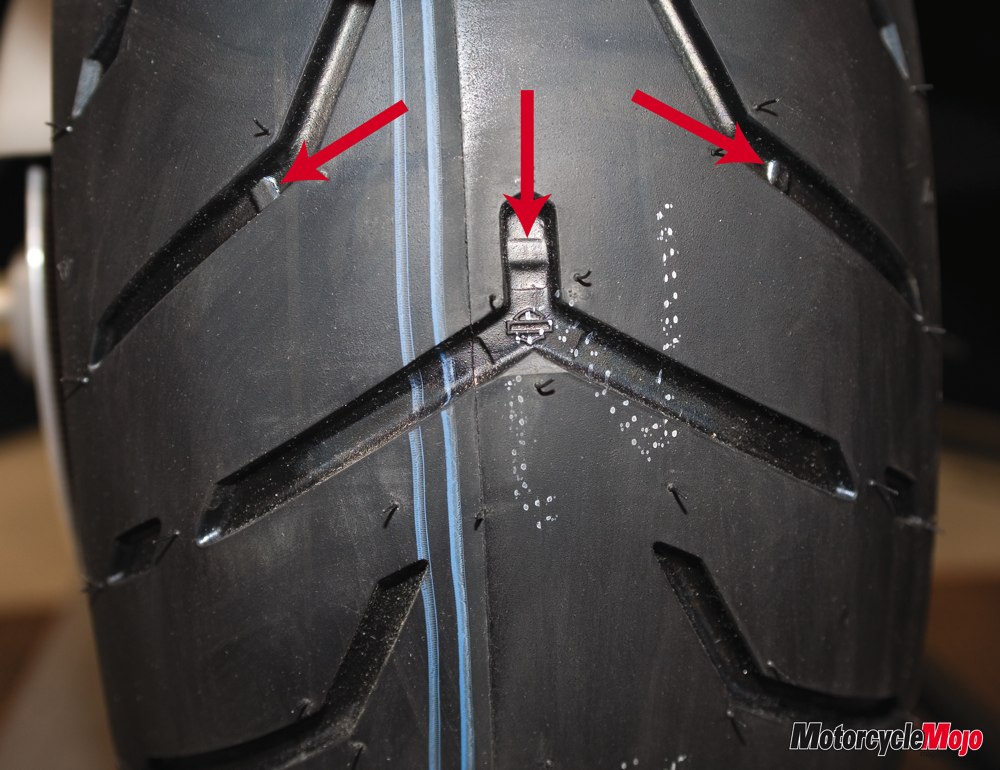
- Tread – Most motorcycle tires have a tread depth indicator built right into the tire. The indicator can be found along the center portion of the tire in the tread. The indicator will look like a slightly raised piece of rubber that will be in between, in depth, from the base of the tread and the surface of the tire.
- If the surface of the tire is flush or close to being flush with the indicator, it’s time to look at getting a new tire. If your tire does not come with an indicator you will need a measuring tool to check the tread depth left and refer to the specification of the tire or owners manual to see if your tire is still good.
- Age of Tire – On the sidewall of the tire there is going to be an imprint saying DOT (a series of numbers and letters) and then four numbers.
- The four numbers indicate the Date of Manufacturing. The first two numbers indicate the week and the last two numbers indicate the year.
- A tire is generally recommended to be no older than 5 years, however, there is much debate on this. As wear on a tire can vary greatly depending on many factors like how it was stored and climate in your area.
- Physical Condition – Make sure you have the correct (cold) tire pressure (recommended tire pressure will be on the bike, the tire, or in the owner’s manual). Look for any foreign objects. Check for flat spots, bulges, cuts, and cracking.
- If there is damage to the tread of the tire, it may be possible to get it repaired. However, if there is sidewall damage, you will likely have to replace the tire.
- Air Valve Stem – For the stem, you are just making sure that the stem allows you to both release air and fill the tire. And that there are no noticeable deformations.
Rims
There are two types of rims typically used on motorcycles: Solid & Spoked. Here is what to look for on each.
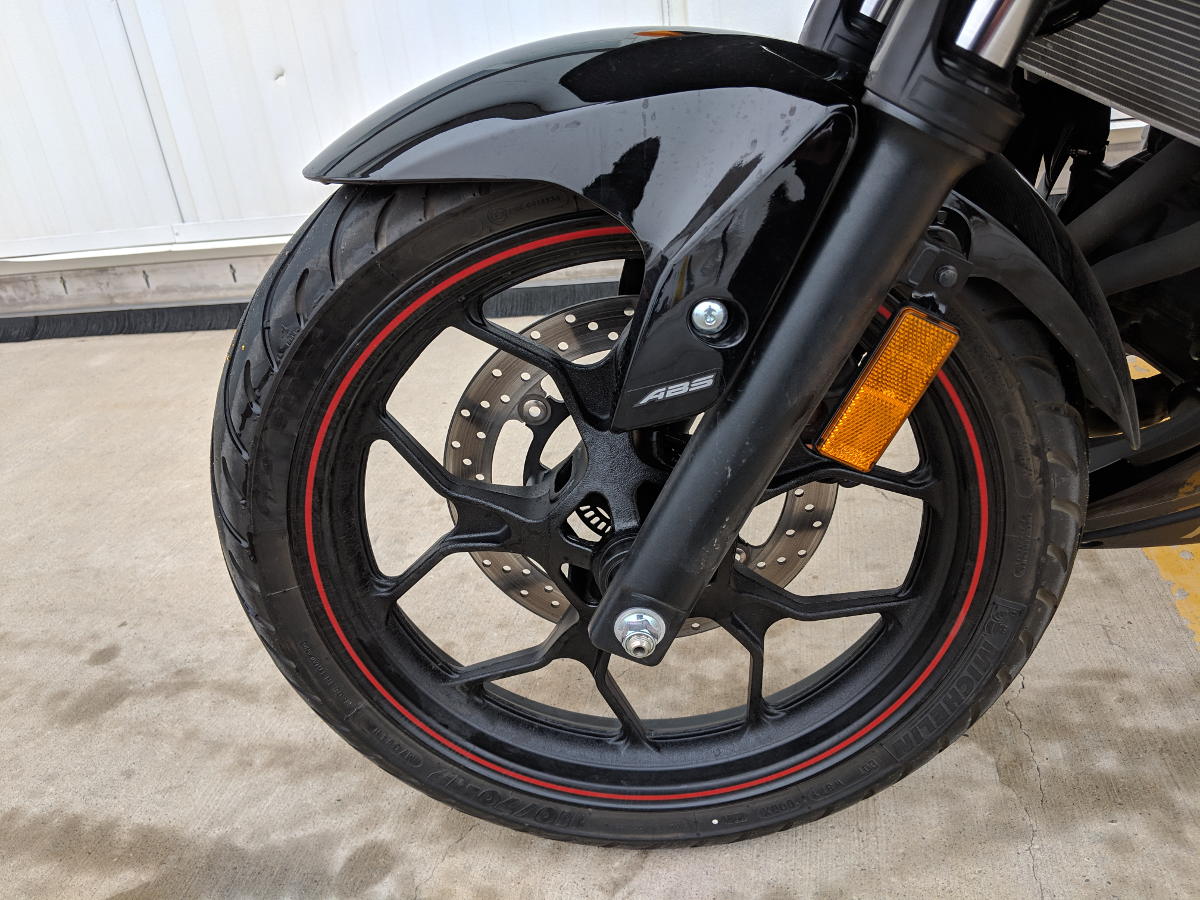
- Solid Rims – This type of rim is the easier of the two to check, as they are meant to be… solid or one piece.
- For a full proper inspection, you want to first make sure the rim is clean. What you will be looking for is paint flaking off (if its a painted rim), cracks and deformities. You will want to pay some extra attention to the part of the rim where the tire tucks into the rim. In my experience, this is where I have seen the most issues.
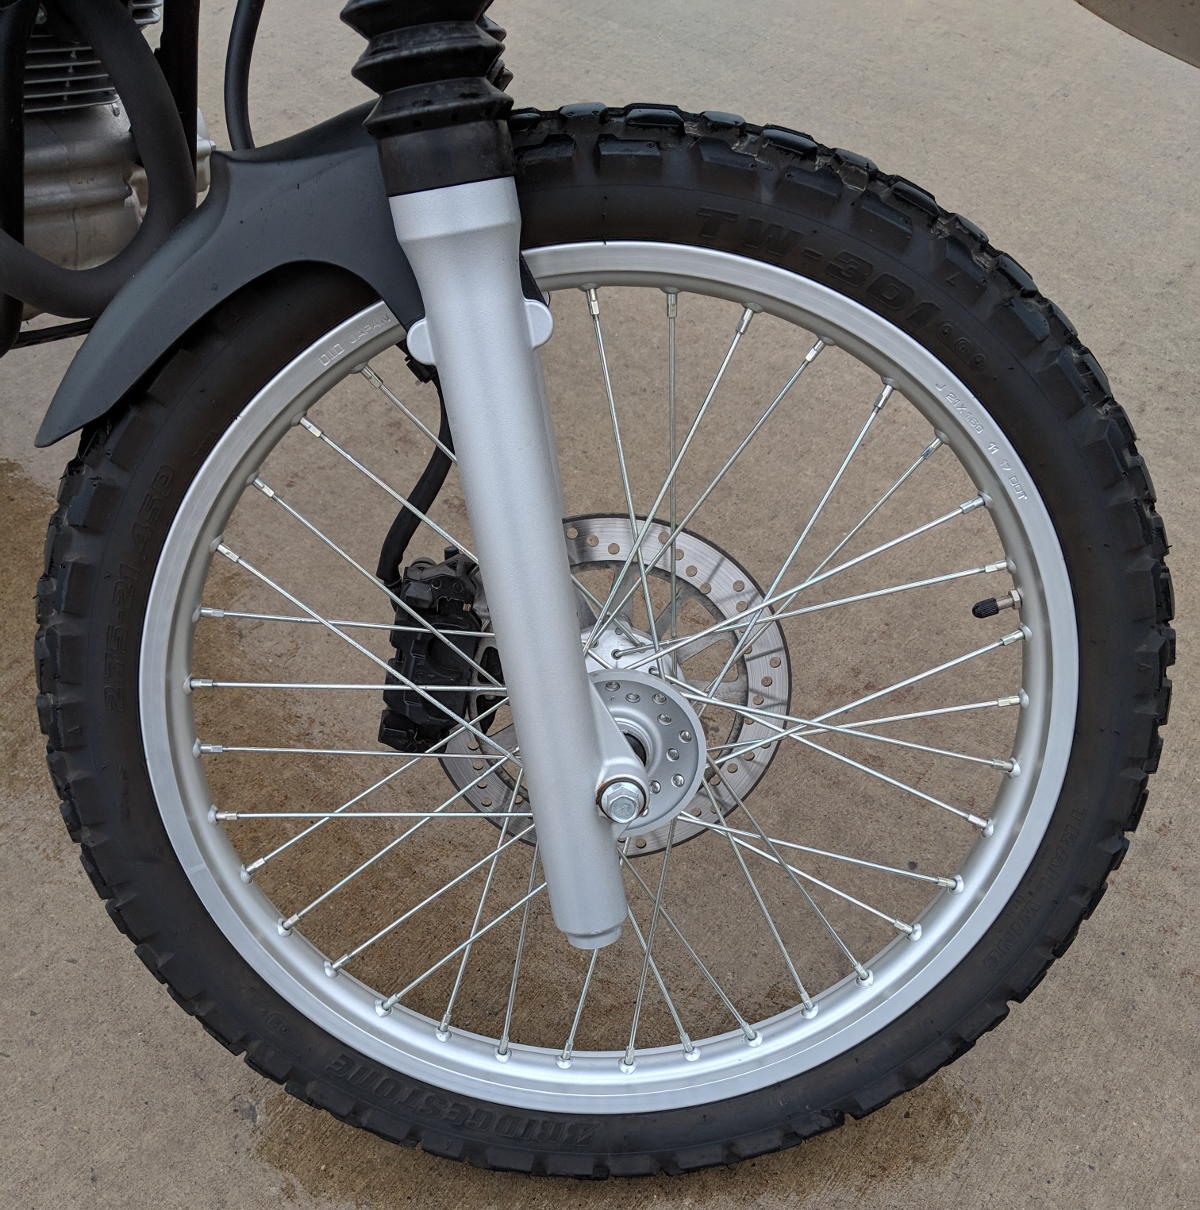
- Spoked Rims – To inspect this kind of rim, you will want to have a pen or pencil.
- The first thing you will want to look for is if there are any spokes missing. Missing spokes are easy to spot as these types of rims are always symmetrical.
- The next thing to look for is loose spokes. Using the pen or pencil, strum across all the spokes and listen to the sound they make. If you have a loose spoke, you will hear a more dull or hollow sound compared to the rest.
- Lastly, you will want to check the outer tire edge for deformities, just like the solid rim.
In my professional opinion, if you have any damage on a rim, it is in your best interest to not ride on it until the rim has been inspected and or adjusted by a professional.
Chassis, Suspension, & Fasteners
Chassis
You are just looking over your frame for any peeling/lifting paint (indicates potential cracks).
You will also want to make sure that your kickstand has very little play when in the down or upright position, so it doesn’t interfere with your riding, and so you don’t accidentally drop the motorcycle because it didn’t stay out when parking.
Suspension
Most motorcycle front suspension is based on fork suspension. So checking them is almost universal, but may just be a little more difficult depending on if the suspension is covered or not. If there is a cover you will just have to temporarily remove it if possible. If you can’t remove it you will have to rely on just physically testing it
- Visually Checking – What you should be looking at is the shiny, smooth part of the fork and make sure that it’s always kept clean. If something is wrong, there will be an oil-like substance, in the form of a ring around the pole.
- Physically Testing – The way to check your suspension is to grab your front brake and force the suspension down and let it pop back up. You are making sure that the suspension is still responsive and smooth. If there are issues the suspension will feel floaty or bouncy.
However, the rear suspension can differ by a good amount depending on the brand, model, and style of the motorcycle. Some motorcycles don’t even have rear suspension. So double check your owners manual for recommendations on your particular model.
Suspension can be a tricky thing – if you see or feel any issues bring it to a mechanic sooner rather than later.
Many motorcycles nowadays come with or have 3rd party, adjustable suspension options to allow the bike to perform properly in accordance with the bikes load weight. To make these adjustment refer to your owners manual.
Nuts, Bolts, & Fasteners
Any kind of nut, bolt, clip, pin, and fasteners within reach needs to be present and tightened. Motorcycles usually have a small tool kit that comes with the bike, if you don’t have one it’s a good idea to make one and put it inside the bike.
Controls, Brakes, & Fluids/Lubricant
Controls
The controls consist of brake/clutch hand levers, rear tire foot brake, shifter foot lever, throttle, and handlebars.
- Brake/Clutch Controls – By applying the control lever and letting them flick back to the original position you can discern if there is anything impeding the input of the control (i.e. the control doesn’t smoothly return to its original positions there is likely adjustment or repairs need to be made).
- Shifter – Push down and lift up on the shifter. “May actually shift gears make sure its back to neutral before turning the bike on” if the shifter returns to the original position, there shouldn’t be any issues.
- Throttle – Similar to testing the other controls you will want to roll the throttle all the way open and then let it go. The throttle should return to its original position smoothly.
- Handlebars – All you are doing with the handlebars is making sure that you can turn all the way left and right smoothly, without pinching any control or electrical cabling.
Brakes
First things first: when applying a brake control no matter what kind, you should not be able to easily if at all, have the brake lever touch the hand grip and the foot lever being maxed out. If this is happening, adjustments should be made or parts replaced/repaired as you are not getting the full braking power out of your bike which could cause issues in a sticky situation.
There are two types of brakes being used on motorcycles at this time: disc brakes & drum brakes.
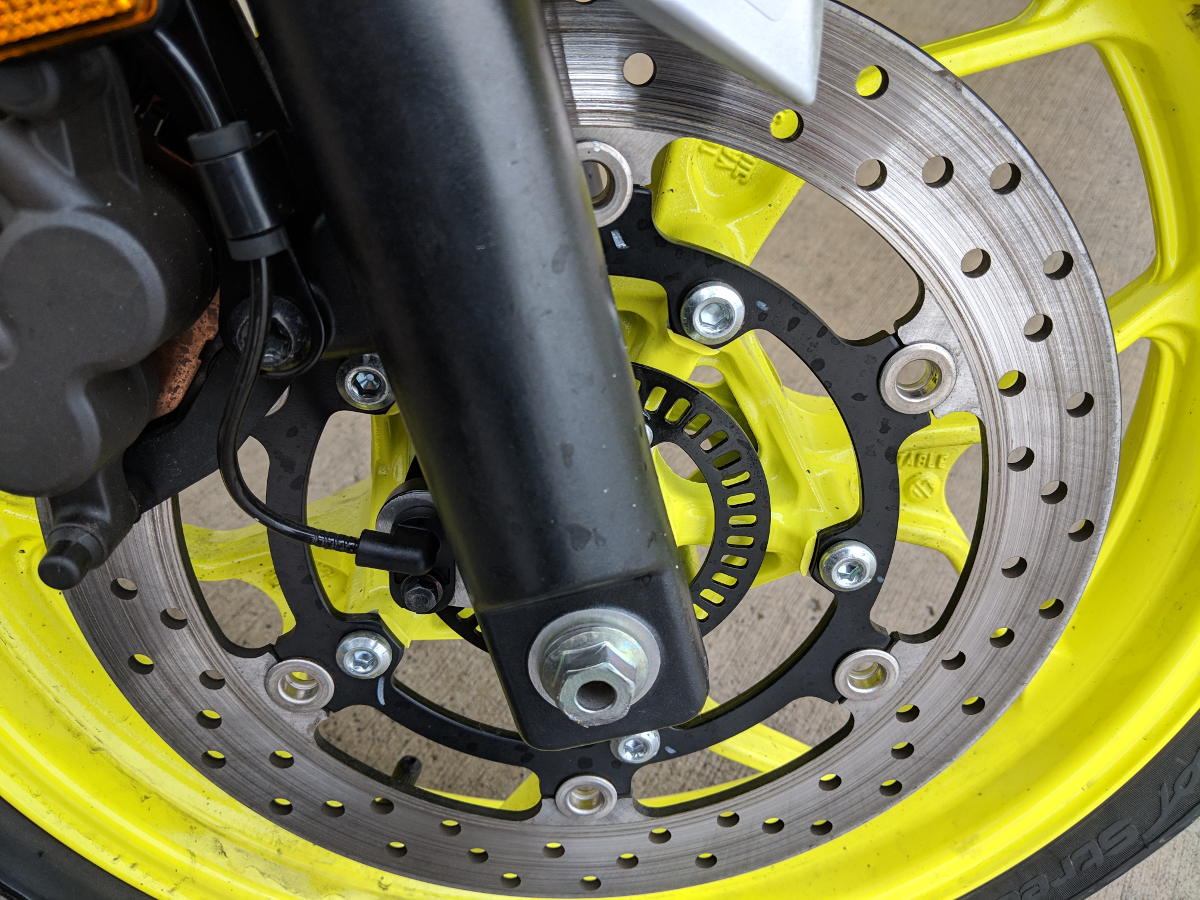
- Disc Brakes – Disc brakes are the most common type of brakes used, and have been for a long time now, as they have much better stopping power and are much easier to maintain. Disc brakes are usually connected to the brake control via a hydraulic line. Disc brakes consist of 4 parts to check: the aforementioned hydraulic lines, the disc, the caliper, and the brake pads.
- Hydraulic lines – Checking for cut and bulges.
- The disc – The disc needs to be clean, straight, and smooth.
-
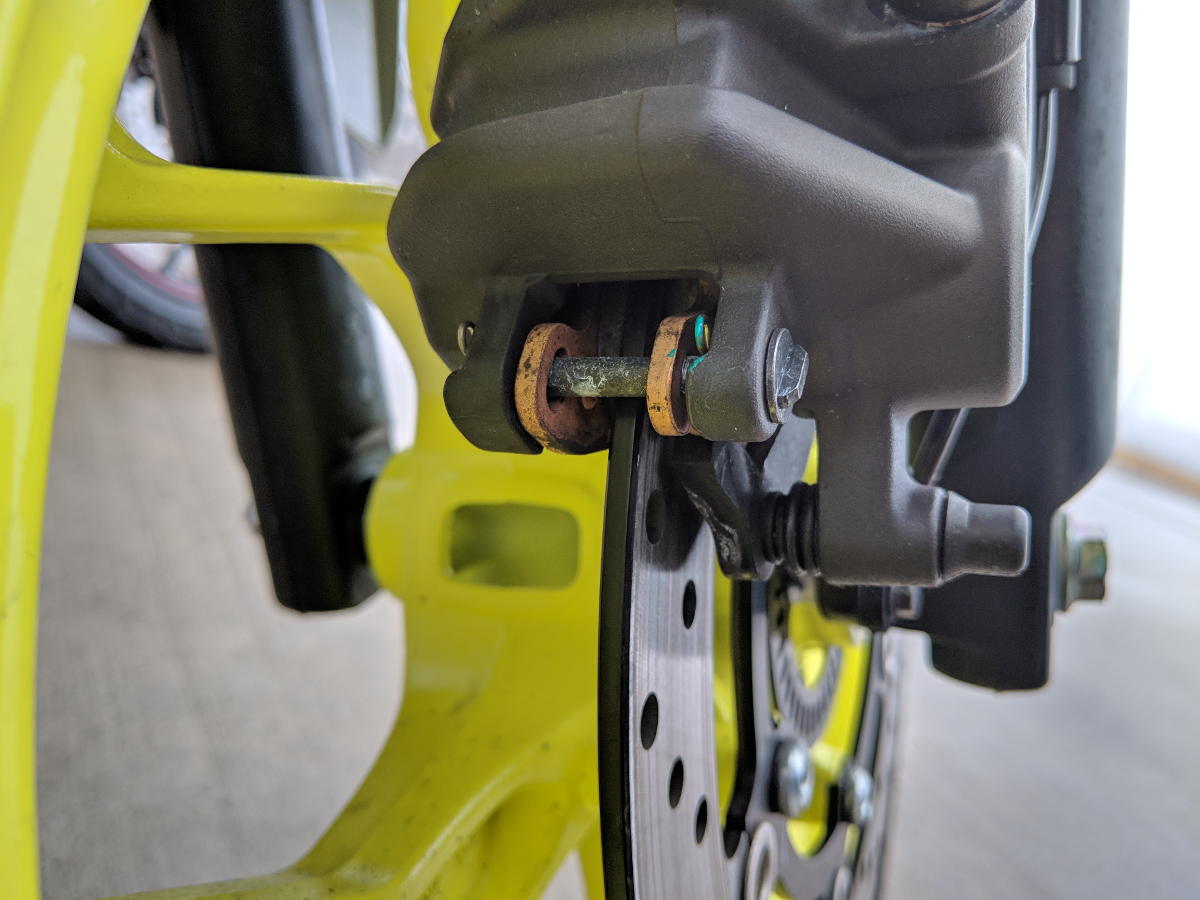
- Caliper – The caliper isn’t always easy to confirm an issue. But the main thing to look out for is if there is brake fluid leaking out or if the brake isn’t engaging when control is applied.
-
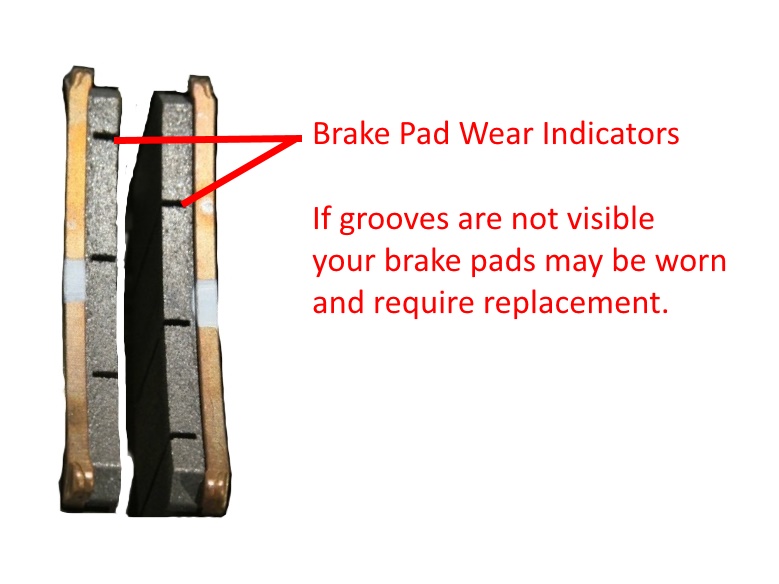
- Brake pads – Just making sure that the pads are wearing down evenly and aren’t worn out. Just like tires, there is usually a piece inside that when the pads are getting close it’s time to replace. You may need to take off caliper or remove pads to do this check. This check can be done with the wheel on the bike.
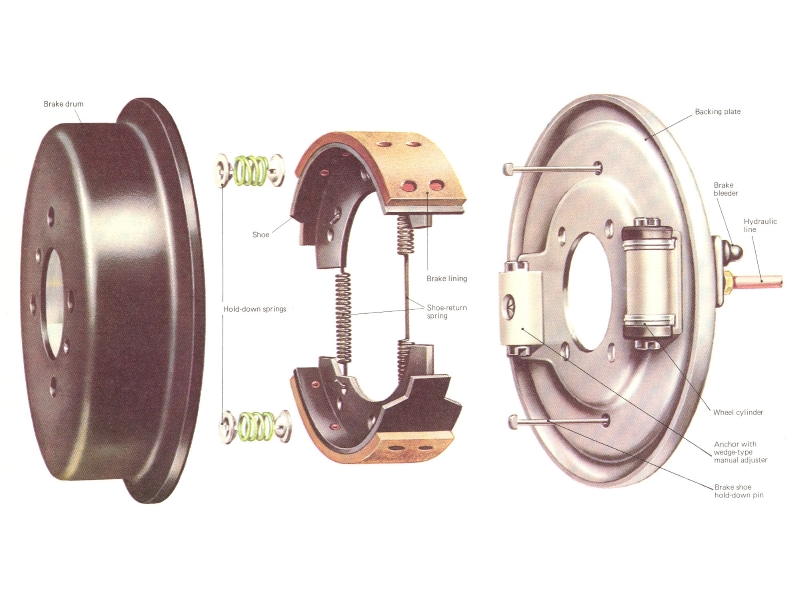
- Drum Brakes – Drum brakes are really only used now on smaller dirt bikes and some cruisers, but if you have an older bike you may still see this at least on the rear tire.
-
- Drum brakes are a little more difficult to check as most of the time you have to remove the wheel to get at them. Due to this, many motorcyclists will not have the ability to inspect this part properly and should be done when you bring your motorcycle in for maintenance. This brake can still be tested by applying the brakes and making sure the control doesn’t reach its maximum distance of travel under full brake load.
Electronics
Before you check any of your electronics on the motorcycle you will want to make sure the battery is good to go first. At this point, the battery should have been on a trickle charger all winter (see more: preparing your motorcycle for winter) or you at least should have gone out and started your bike a few times during the off-season to give some charge back to the bike.
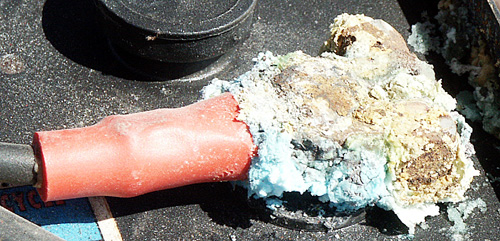
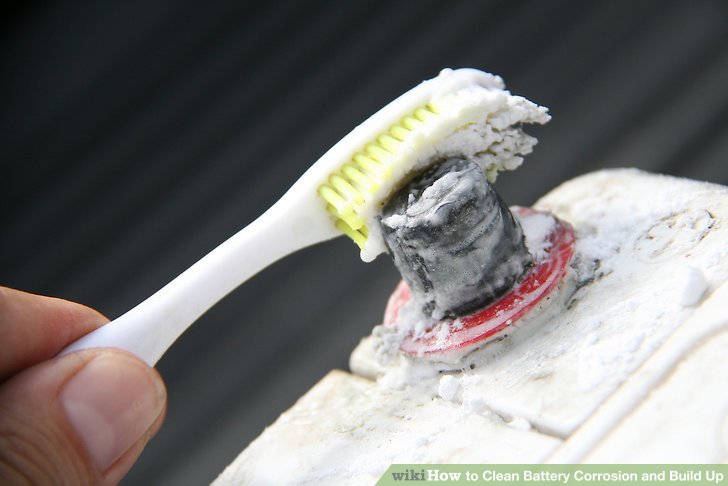
Over time the leads on a battery can accumulate corrosion. You will want to clean this away to make sure you get a solid connection for stable power delivery to the motorcycle. If you notice that the battery isn’t holding a charge or is not delivering as much power when you start the bike it may be time to look at a new battery.
Once you put the battery into the bike and made sure the electrical connections are clean and tight, you are ready to start testing all the electronics on your bike.
All standard electronics on a bike consists of:
- Signal lights
- Headlights + high beams
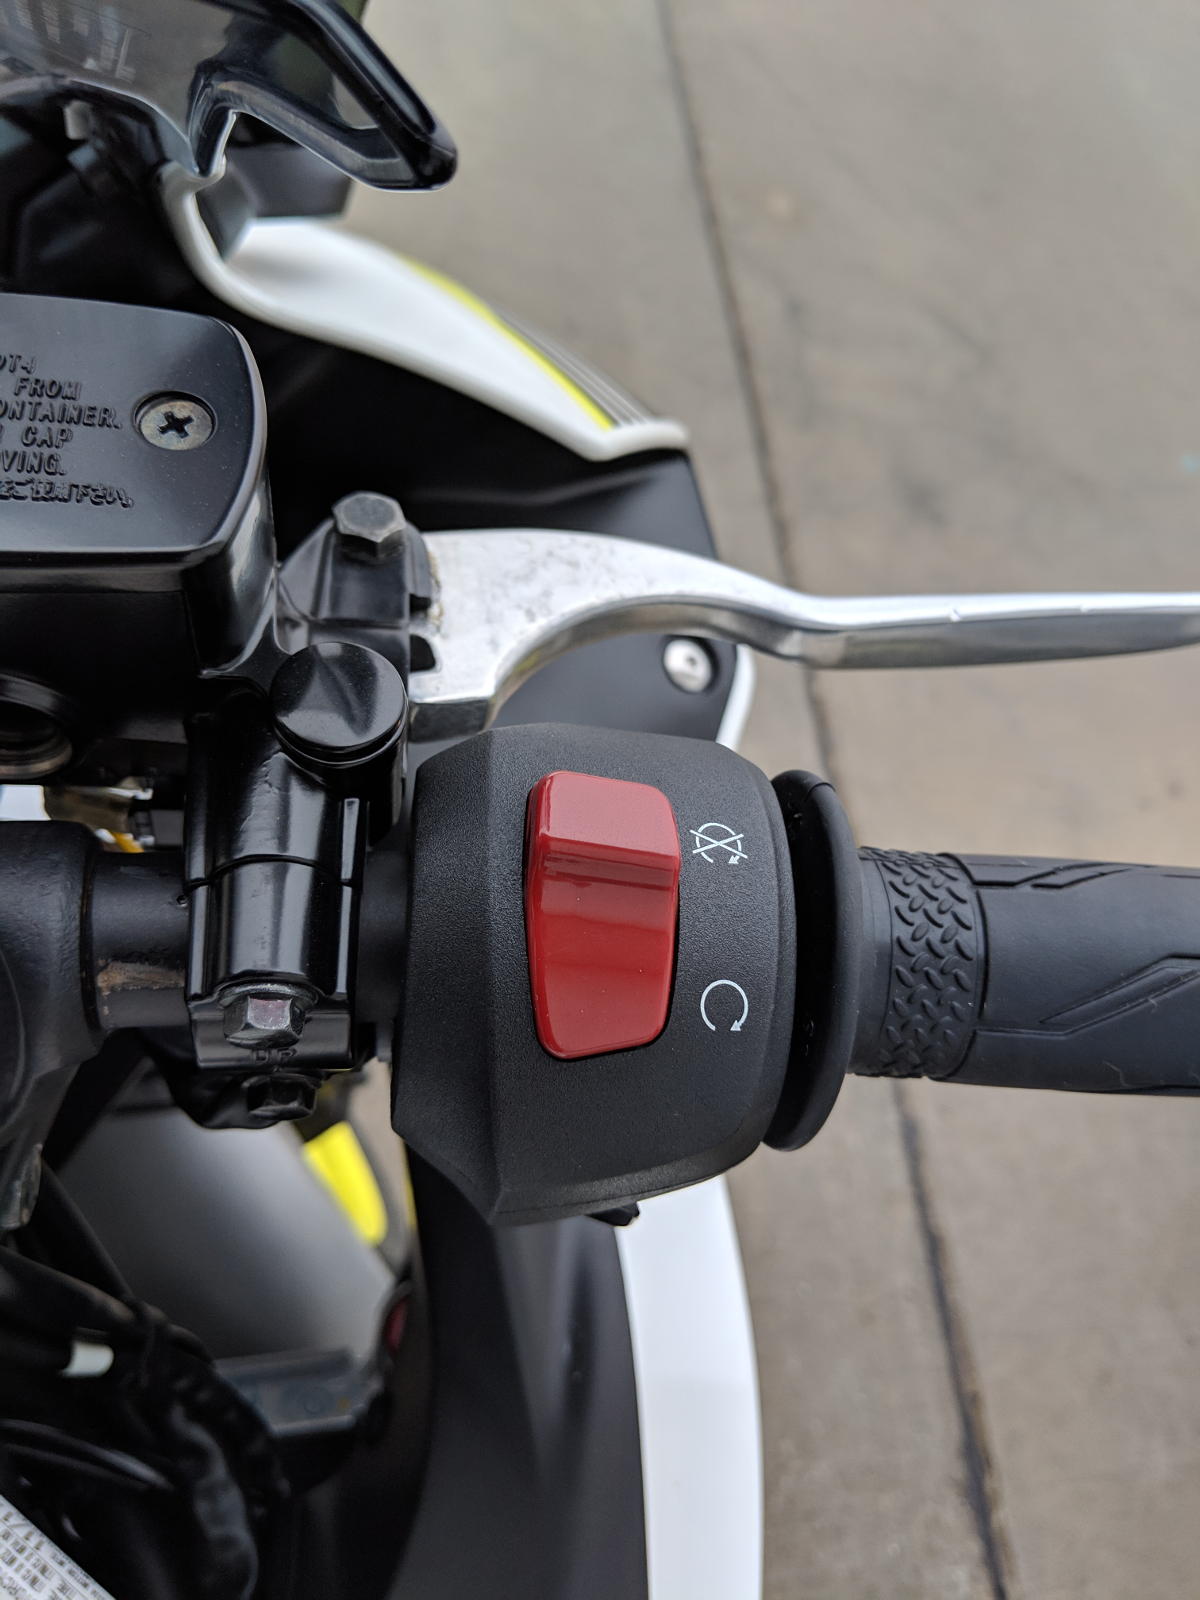
- Engine kill switch
- Brake lights
- The starter
Now most of us like to accessorize our motorcycles to include things like:
- Supplemental lighting
- GPS
- Stereo
- Com systems
- Cameras
- Garage door openers
- Heated hand grips
- And more!
So now is the time to start the bike up and make sure it’s all working.
Drive Train, Fluids, & Lubricants
There are three different ways to deliver power from the engine to the rear wheel. Through a chain driven, belt driven, and shaft driven.
- Chain & Sprocket Driven – Chain driven motorcycles are the most common on the road right now as they are relatively cheap and if maintained correctly last a long time.
- When checking a chain and sprocket on a motorcycle, you will want to first make sure it’s clean and lubricated. You will typically want to lubricate the chain the day before you actually take it out so the lubricant can soak into the chain and its seals.
- After that, you can check the wear and tear on the chain and sprocket itself by seeing how rounded the sprocket teeth are and by the condition of the chain. You should also be checking for rust. If you have to replace a chain or a sprocket you will want to replace both at the same time.
- The last thing to check is the chain tension. This should be adjusted in accordance with what the owners manual recommends.
- Belt Driven – The belt drive is a little easier, as you only need to check the condition and tension of the belt.
- Shaft Driven – This type has the least amount of maintenance needed as it’s hard fastened to the wheel and a sealed unit. This type usually shares the engine oil for lubrication.

Like cars, bikes have fluids and lubricants that are needed to keep the vehicle running smoothly, safely and prolong the life of the vehicle. Here is a list of things that need to be either topped up, changed out, or reapplied.
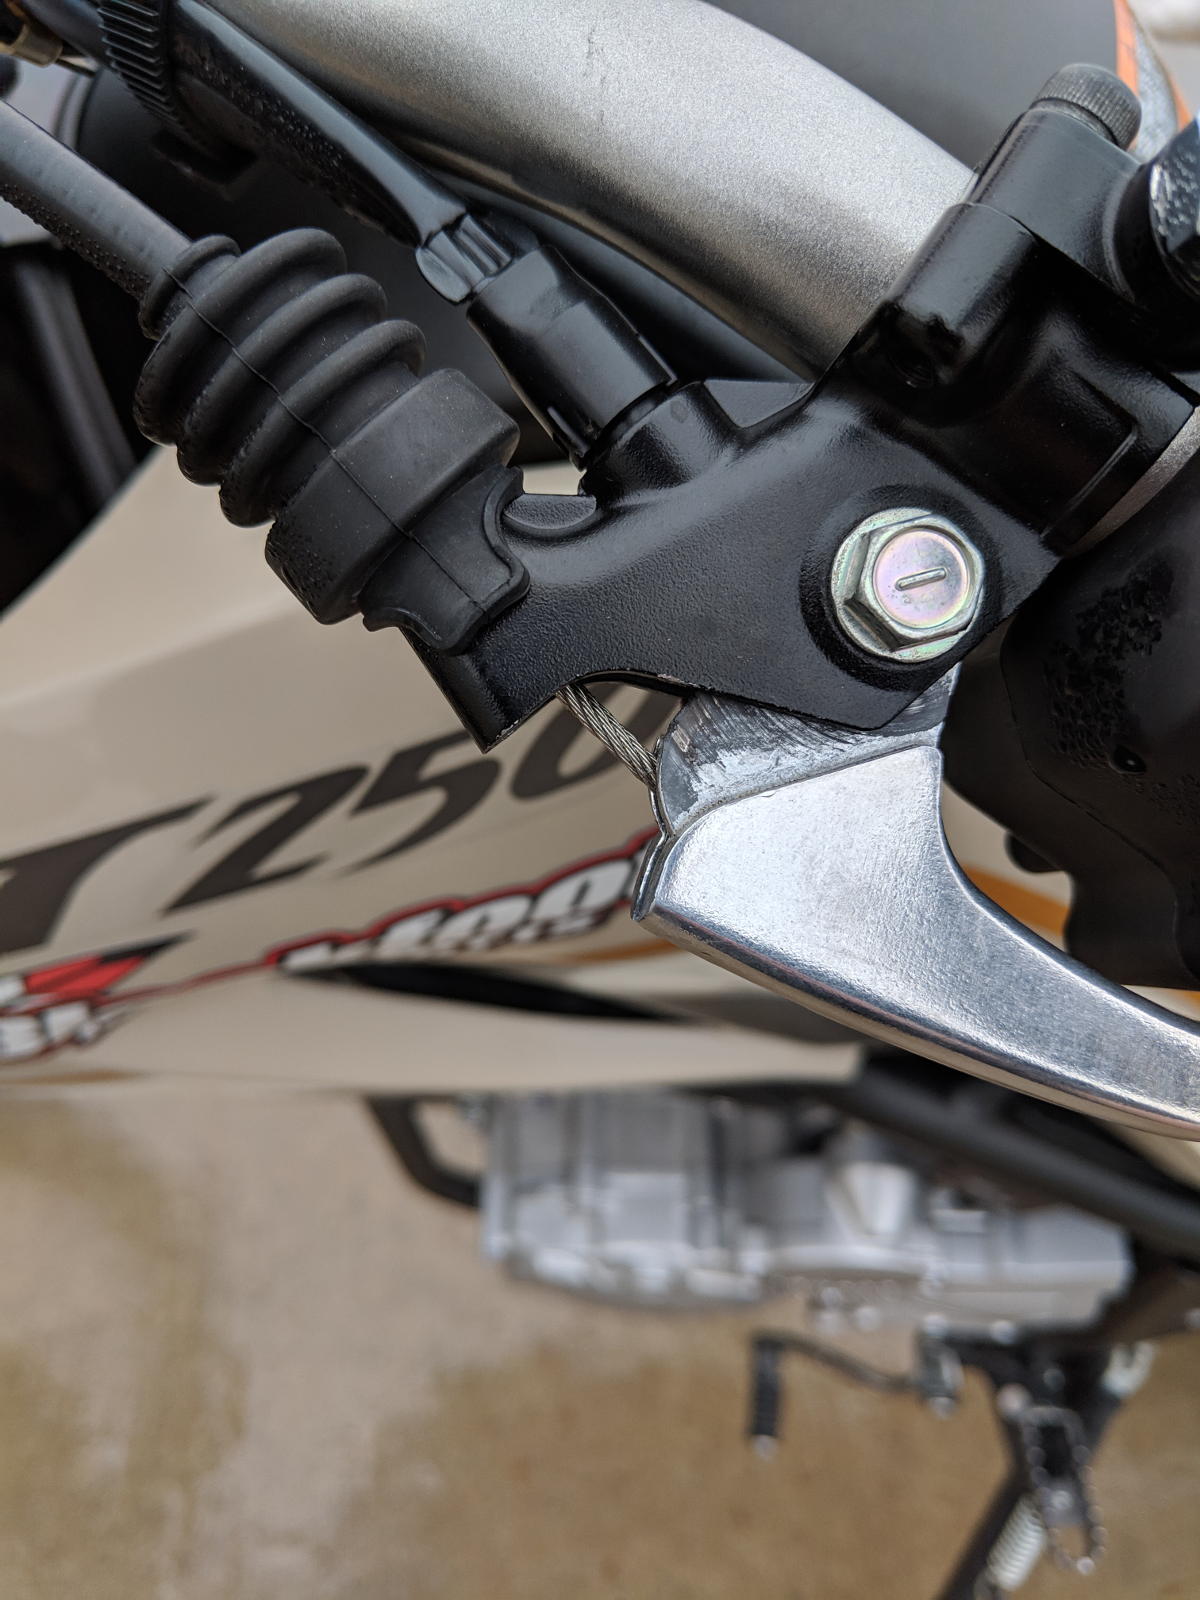
- Wire Cables – Cables have grease or oil that can be applied to help reduce the chance of the cable fraying or sticking. Often found on the clutch or brake levers.
- Chain & Sprocket – Needs to have the chain cleaned and reapply lubrication, the frequency can vary depending on the weather and road conditions.
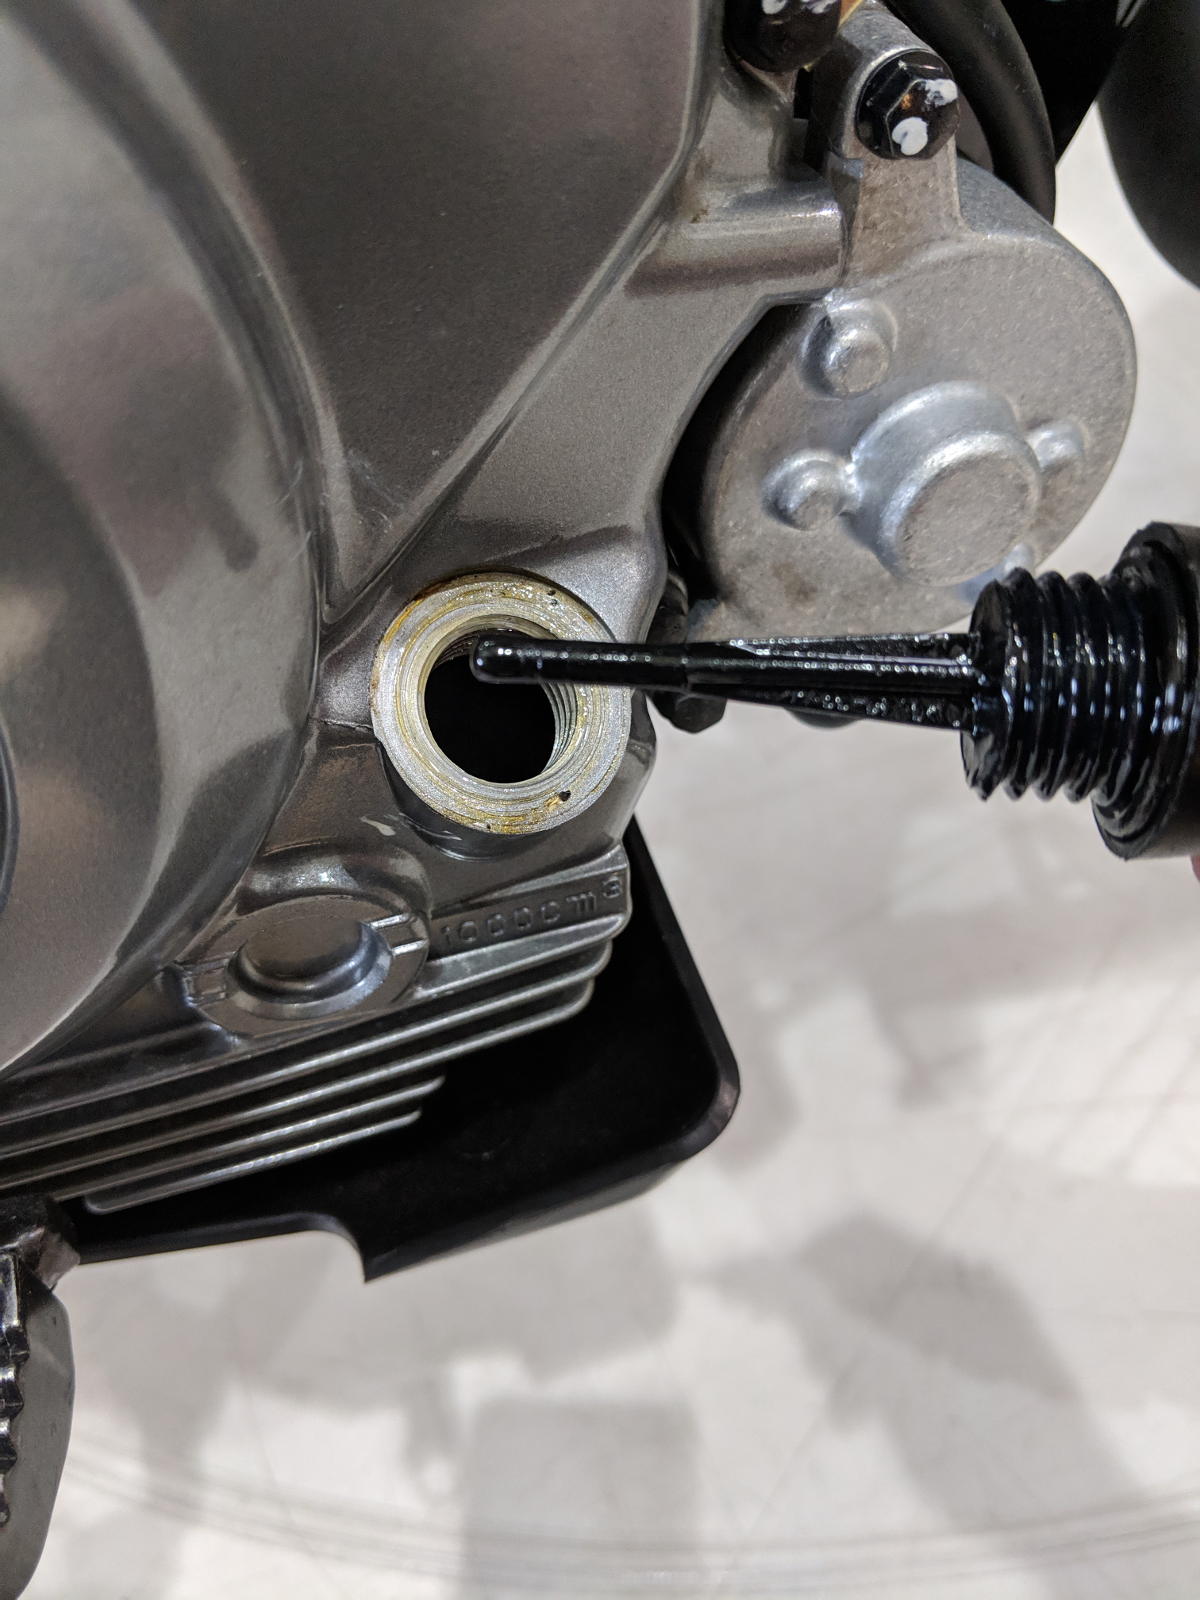
- Oil Change – Checking Oil to see if there is discoloration from the original color, and making sure there is still the correct volume.
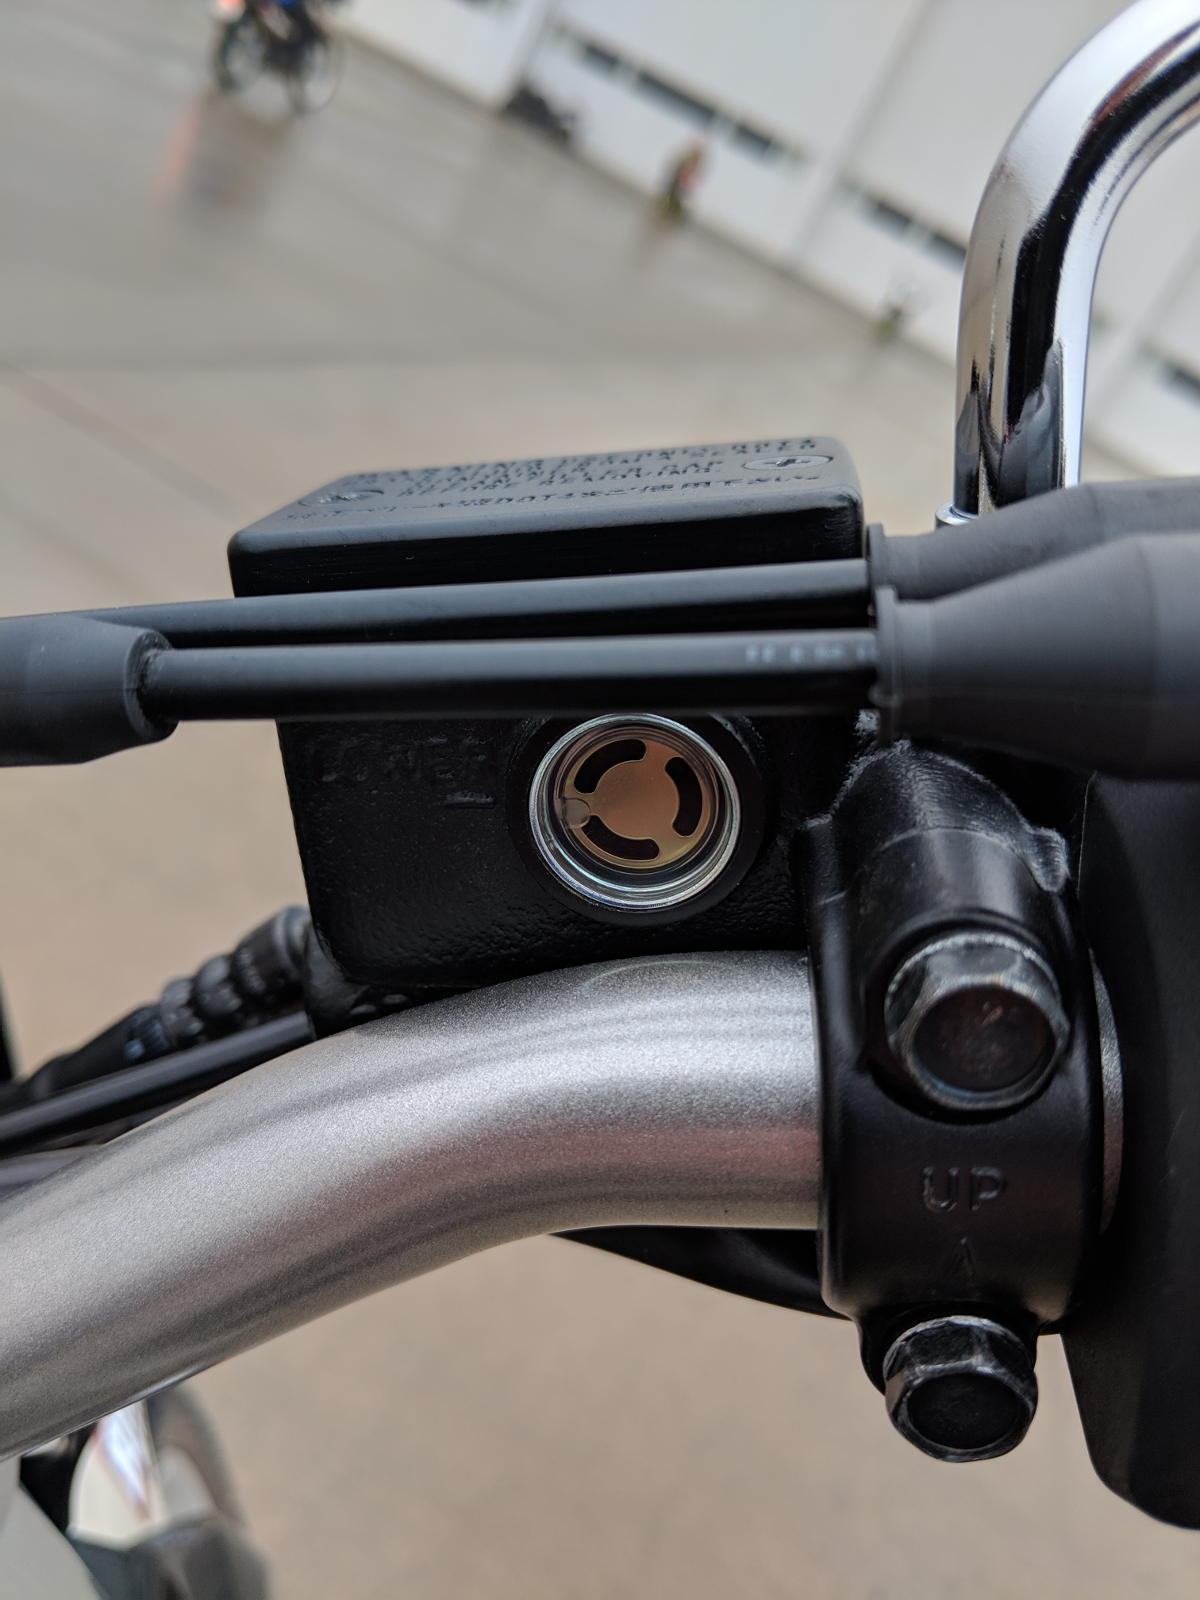
- Hydraulic Fluid – You can see the brake fluid in a reservoir through a viewing window. If the fluid is cloudy or the reservoir is low, its likely time to change. Something to keep an eye on but not something that needs to be constantly monitored. Brake fluid is recommended to change every two years. But can longer or shorter depending on driving habits.
Pre-Ride Checks to Do Every Time You Ride
Wheels & Tires
Our wheels and tires are our lifelines to the road, they are also the part of the motorcycle that is most affected by wear and tear when we ride. Because of this its a REALLY good idea to check your tires for any abnormalities that may have been picked up or caused from the road and check tire pressures.
I know getting to the tire nub to check pressure can be a pain on some bikes but at the very least, once you get comfortable with how your bike tires feel you can apply the front brake and give a good push on the handlebars to check the front tire and hop a little on the seat to check the back tire. If anything is really wrong you can typically tell right away. “This is assuming that you are taking the time to check tire pressures, properly with a gauge, on a weekly basis.”
Controls Check
Controls check applies to the “brake/clutch lever, throttle, foot brake, foot shifter” and is very simple to do. Just apply the control and let it go – if it flicks back to its proper static position quickly and without resistance or stickiness the controls should be good.
Brakes
Making sure the brakes are also very easy to check. Apply each brake and make sure the lever isn’t traveling too far, before giving you feedback from the brake being applied, and then rock the motorcycle forward and back. If the bike is locked in place the brakes are working.
Signal Lights/Headlights
Motorists have a hard time seeing motorcycles on a good day. Without functioning lights, that visibility becomes even less. As much a lights typically last a long time, they can fail at any time, and you may not know unless you check. Lights that need to be checked are brake light, signal lights, headlight. Make sure the lights are also clean.
License & Insurance/Registration
You will want to make sure you either have your paperwork in the bike or on your person at all times. And double check you have your keys. It sucks getting locked out… trust me.
Gasoline
You always want to make sure you have gas before you leave. Make sure you are actually opening up the gas cap as I have had more than one occasion where my fuel gauge has lied to me.
I try and make a habit of filling my bike every time on my way home from a ride so that I know I have a full tank when I leave but still make sure JIC. Also, a good time if you have a fuel petcock valve is to make sure it’s in the on position not reserve just in case you rely on that as a low fuel warning.
Perform Checks on a Weekly Basis or If You Don’t Ride Often
A diligent rider will want to follow this list if they are riding their bike regularly on a weekly basis. Or if they haven’t ridden the bike for a while.
- Tires & Rims – Do a very thorough visual and comprehensive check on both the front and back wheels. They are our lifeline to keeping the rubber side down.
- Lever & Lines – Checking for frays in the cables and that the controls are properly adjusted.
- Fluids Check – Checking oil, and brake fluids for both level and clearness.
- Chassis & Fasteners – Visual overview of the bike to make sure no damage, leaks, or broken clips/fasteners.
Do a Full Check Often
If involved in any sort of abnormal riding experience such as running over a really bad pothole, pushed off the road or running over debris – I will, at my earliest chance, pull over and do as much of a full check as I can to make sure I am proceeding safely.
I take long motorcycle trips with my father every summer. We are hard on the bikes so I always do a full check the day before I leave and the day after I get home. Sleep usually comes first.
I also recommend doing another full check sometime mid-season to make sure that you don’t encounter any surprises.