
The average motorcycle these days is capable of putting down the same amount of power as a small car, and all of that through the drive chain. Running it dry of lubrication and not cleaning the road gunk and dirt off it regularly are things that could shorten the lifespan of not only the chain, but of your sprockets as well. And if that road grime can work its way past the link seals in your chain, it could bind or break while you’re riding, leaving you stranded on the side of the road waiting for a tow truck with a motorcycle hoist to come pick you up.
Chain maintenance is one of the most vital, but also most overlooked, part of keeping your bike safe to ride. If your motorcycle maintenance routine right now is to give it a quick blast with a pressure washer when it looks dirty, and a squirt of chain lube every so often, then this guide is for you. When you’ve finished reading this article, you will be equipped with the basic knowledge needed to up your chain game, extending the life and enjoyment of your bike.
Please note, however, that this is not meant to be a be-all, end-all guide. This is a beginner’s guide, so that you can identify potential issues that might be remedied before they become actual problems. As well, if in doubt, refer to the maintenance section of your owner’s manual. That manual contains every important timeframe, service period, method of maintenance, and all the tools you’ll need are listed. Whatever your manual states trumps absolutely anything in this beginner’s guide.
Inspection: Common Issues & Signs of Wear on Your Chain
Realistically, you should be giving your chain a once over as part of your pre-ride walkaround check. You do a pre-ride walkaround check, right? What you are looking for are kinked or stuck links, signs of rust, how much vertical free play is in the chain, and how the chain is meshing with both the drive and rear wheel sprockets.
Breaking that inspection down into components:
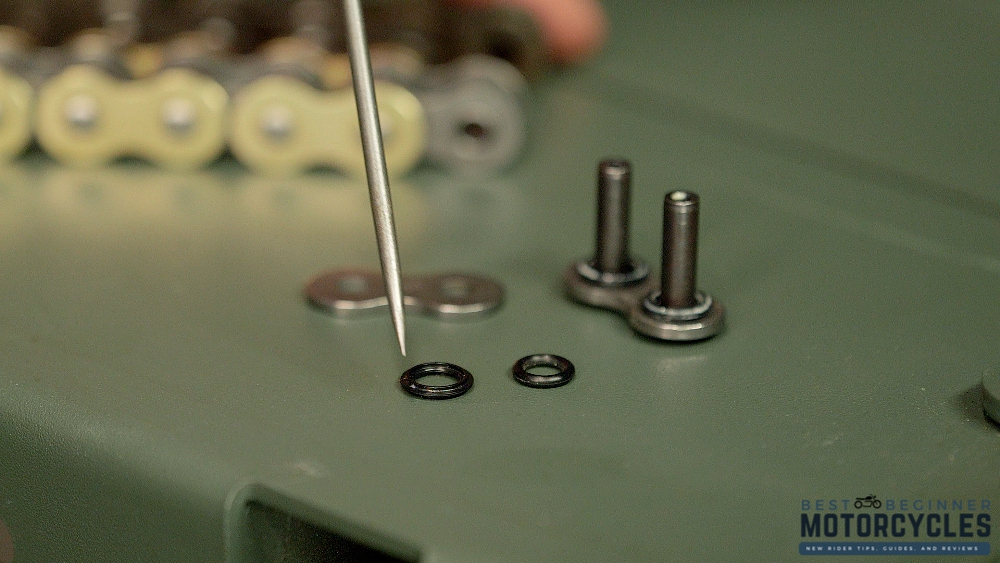
- Kinked or stuck links are signs of inadequate lubrication or failed pin-and-sleeve O-ring seals, and almost always indicate that you should get a new chain.
- Tight or stuck links when rotating the rear wheel in neutral are signs that there is either inadequate lubrication on the chain or that the chain is worn and reaching the end of its service life.
- Rust on a chain is a matter of subjective appraisal. If it’s just surface rust, and you catch it when it’s “speckled,” or little pinpoints of rust just starting to form, a more vigorous chain cleaning (explained in the next section) with a nylon or silicone brush should allow for it to be cleaned off. If the rust, however, has progressed to the point where you can see pitting (when removed, the rust leaves a hole behind) or the link that is rusty is difficult to manipulate and feels seized, then it is time to replace that chain.
- Vertical free play in a chain speaks to chain tension. Your owners manual will have a section about maintenance, and in that section, the tension tolerances will list a minimum and a maximum amount of deflection. Keeping your chain within those tolerances, and adjusting the tension when they are outside of them, will lead to a longer chain life and better response to throttle input.
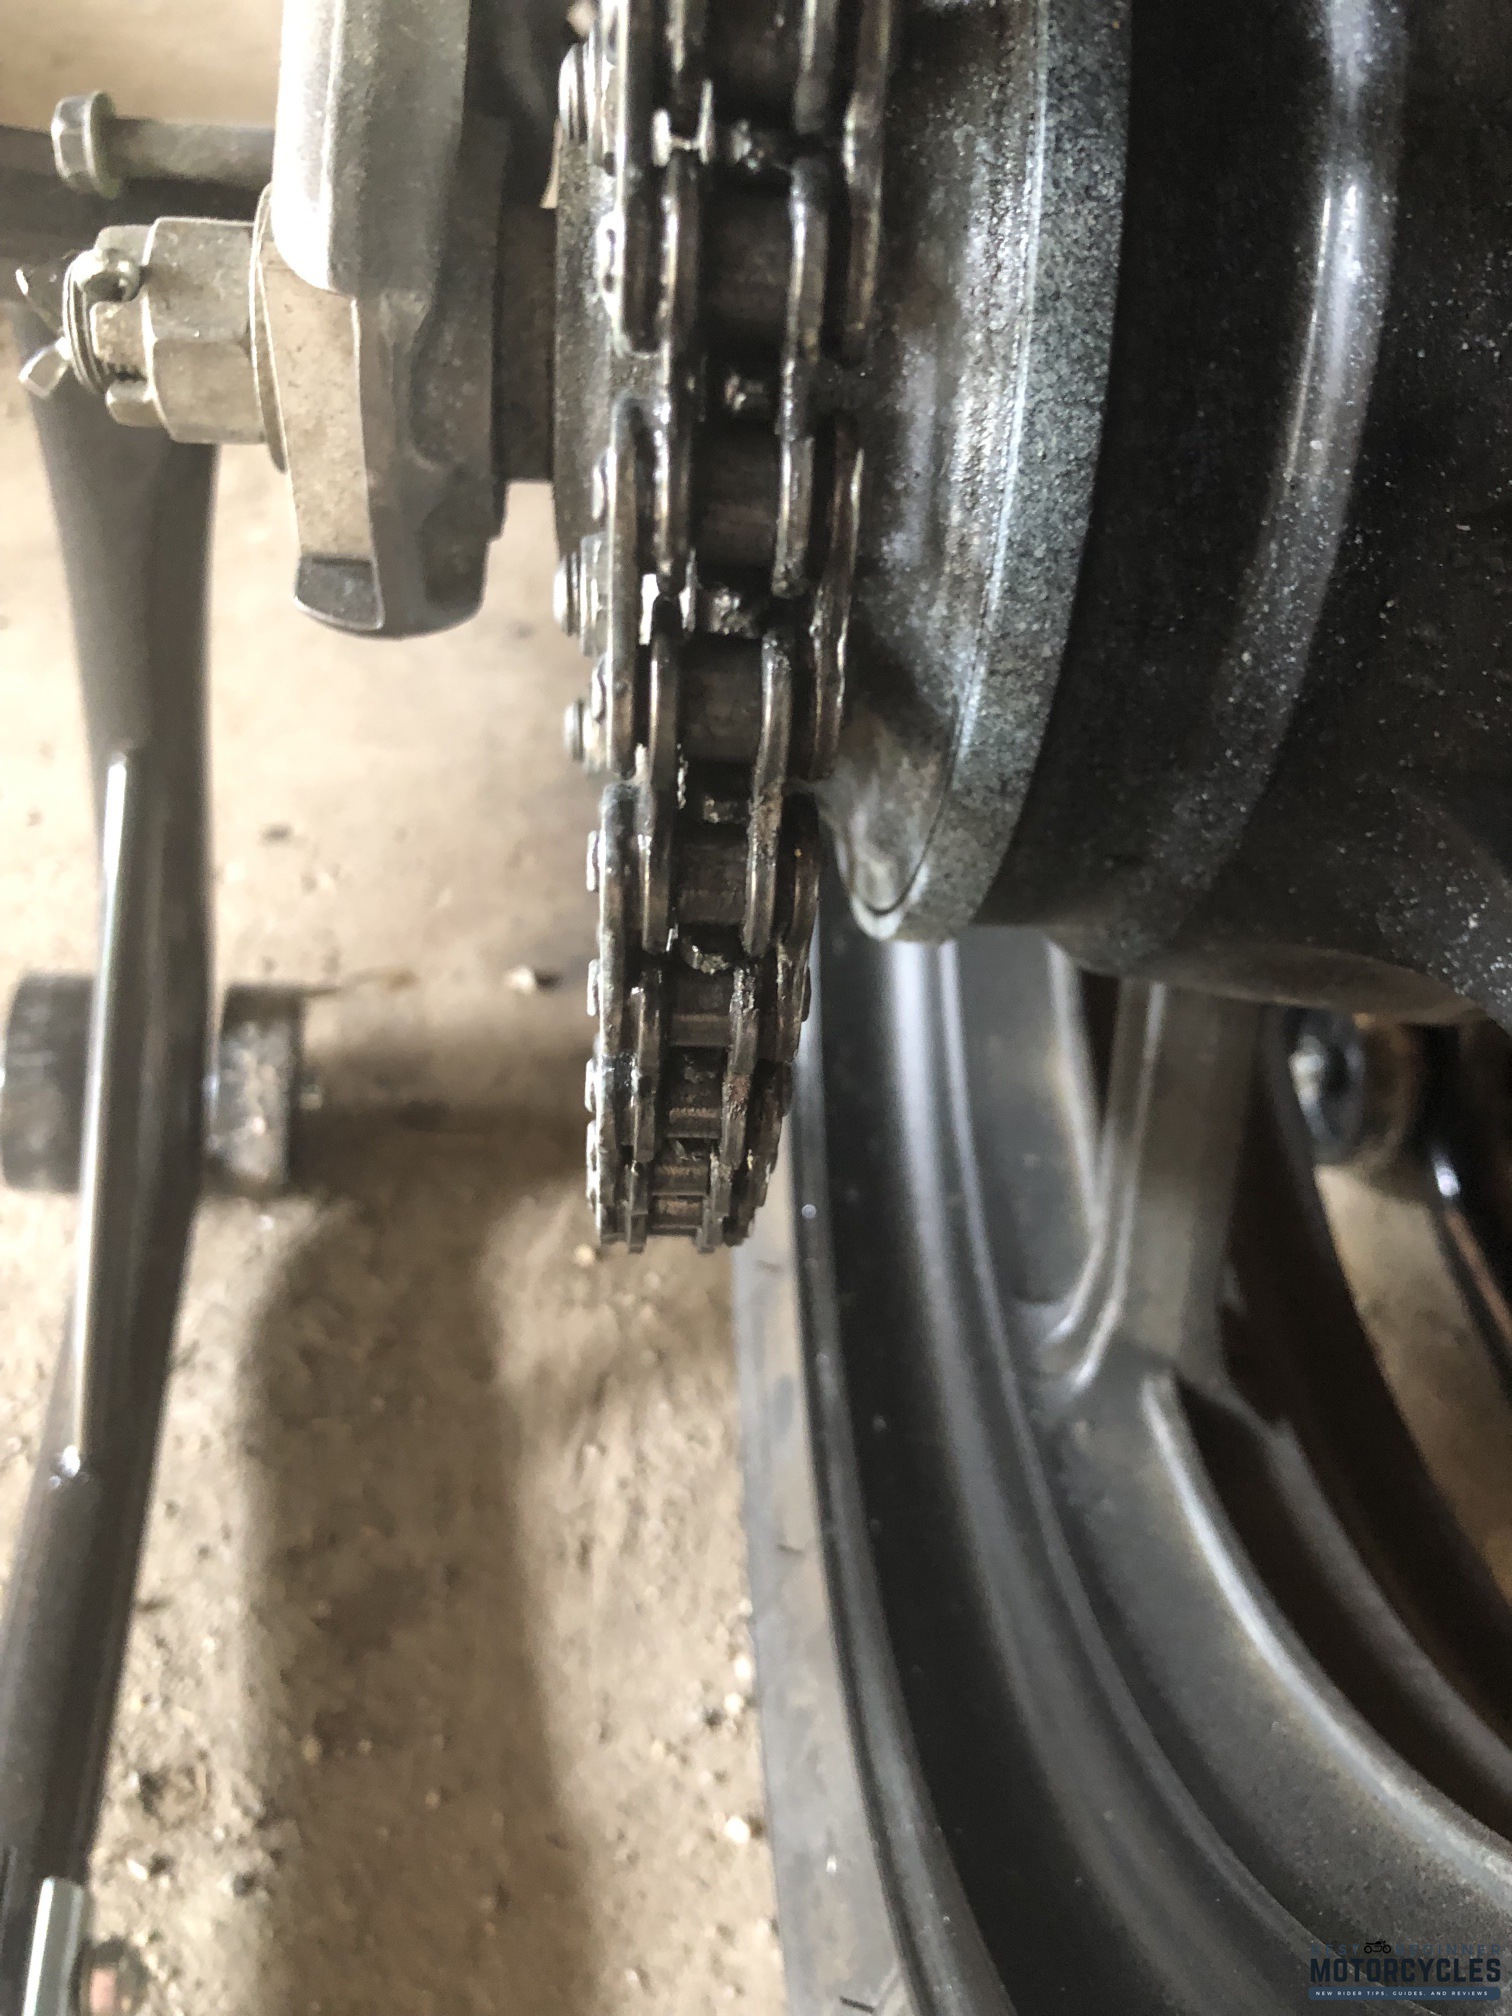
- Horizontal play on a chain speaks to if the chain has worn down to the point it might be unsafe. To check this, find the point on your rear sprocket where the chain is directly opposite to the drive (front) sprocket. Pinch the chain there, and pull it away from the rear sprocket. It should pull about ¼ to ½ an inch away at most, which is due to the chain tension above. If you can pull the chain significantly away from the sprocket, more than ½ an inch, it is a definite sign that either the chain, or the front sprocket, are in need of replacing.
- Chain interaction with both sprockets speaks to both how clean and lubricated the chain is, as well as inevitable wear and tear on the sprocket teeth. A tooth should be flat at the top and have a smooth, constant curve between the teeth. If the teeth are rounded, are thinner than other teeth on the sprocket, or one side of the dip between teeth is worn down, that is called “hooking” in motorcycle mechanic language—and it is heavily suggested that you replace the chain and sprockets soon.
- The safest bet here is to replace both front and rear sprockets as well as the chain. You will typically find that both sprockets wear uniformly but in some cases the front sprocket will be the first to wear down. This is also why it is important to keep correct chain tension, described above, as a loose chain might “hook up” if you suddenly apply throttle, wearing against the teeth or even potentially breaking a link, in which case you will be thankful 95% of motorcycles today come with chain guards.
Cleaning & Lubrication: How To Do It & How Often
Right out of the gate, let’s tackle the second half of that header above. A good rule of thumb is if you ride intelligently and don’t try to drain your fuel tank in 30 minutes, you should clean and lube every two fills of a tank. This translates, for regular use, about once every two weeks, or once every 400 to 800 miles.
You should also clean and lube your chain before you put your bike away for the winter, if you live where it will get icy and snowy, and it should be one of the first things you do in the spring when you bring the bike back out.
An exception to that rule of thumb is if you own an ADV or dirt bike and actually go out on the dirt, as you’re likely to get much more mud, sediment, dirt, and nasty stuff on the chain riding off-road than you do on the road. In that case, it is prudent to clean your chain after a particularly dirty ride, or, if it’s dry and dusty, once every fuel tank. If you want to go off of calendar times, once a week for light use, and after each ride when you get really muddy and dirty.
With the timeframes and recommended intervals out of the way, there are three vital tools you’ll need to actually clean a chain:
The first is some type of motorcycle chain cleaner, preferably one that does not contain twenty chemicals you have trouble pronouncing and markets itself as an all-in-one miracle motorcycle greasy bits cleaner. The most commonly used cleaner, mostly because it is extremely inexpensive, is clear kerosene, lightly applied on a rag or in a spray bottle.
If you want to use a brand name cleaner, consider something like Tirox, which is a kerosene based cleaner that also has rubber conditioner for the seal as well as rust inhibitors mixed in. If it really comes down to “what do I have in my cleaning supplies,” WD-40 is a water-penetrating oil that does not harm seals, but you will need to make sure that it is all off of the chain before applying chain lube.

A word of warning, though, as kerosene, either on its own or in a name brand cleaner, is extremely flammable, so only clean your chain with your bike’s engine cooled enough you can put your hand on it and keep it there without burning, in a well ventilated space or even outside, and with any possible source of ignition kept well away.
The best time to do a chain cleaning and lube is while the chain is still “warm,” so 10 to 20 minutes after a ride after the engine and exhausts have cooled to the point of not being burning hot.
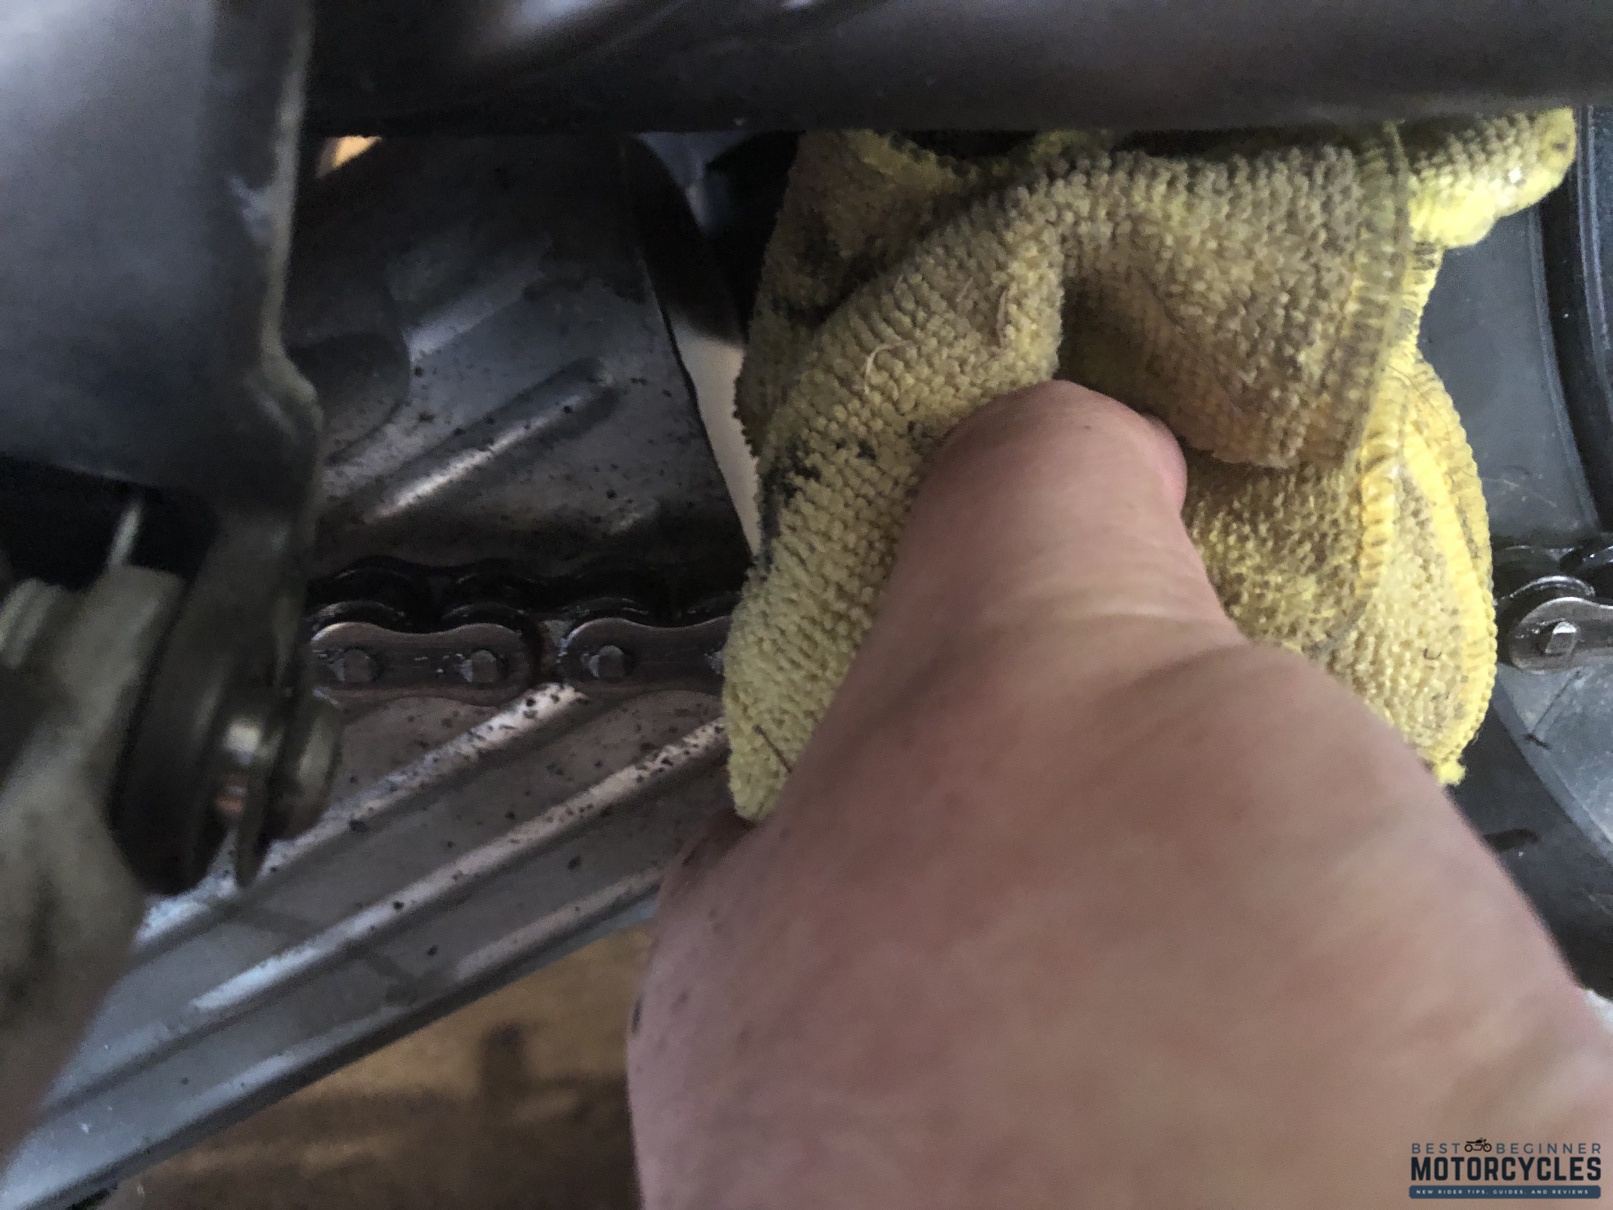
The second tool you need is some type of agitator. This can be everything from a specifically designed motorcycle chain brush with soft nylon bristles to a microfiber cloth held lightly against the chain itself. NEVER use a wire brush, as these can damage link seals and scratch any surface treatment the chain received when manufactured. The purpose of this is to clean off grime, dirt, oils, and the like from the chain, without damaging the seals or links.
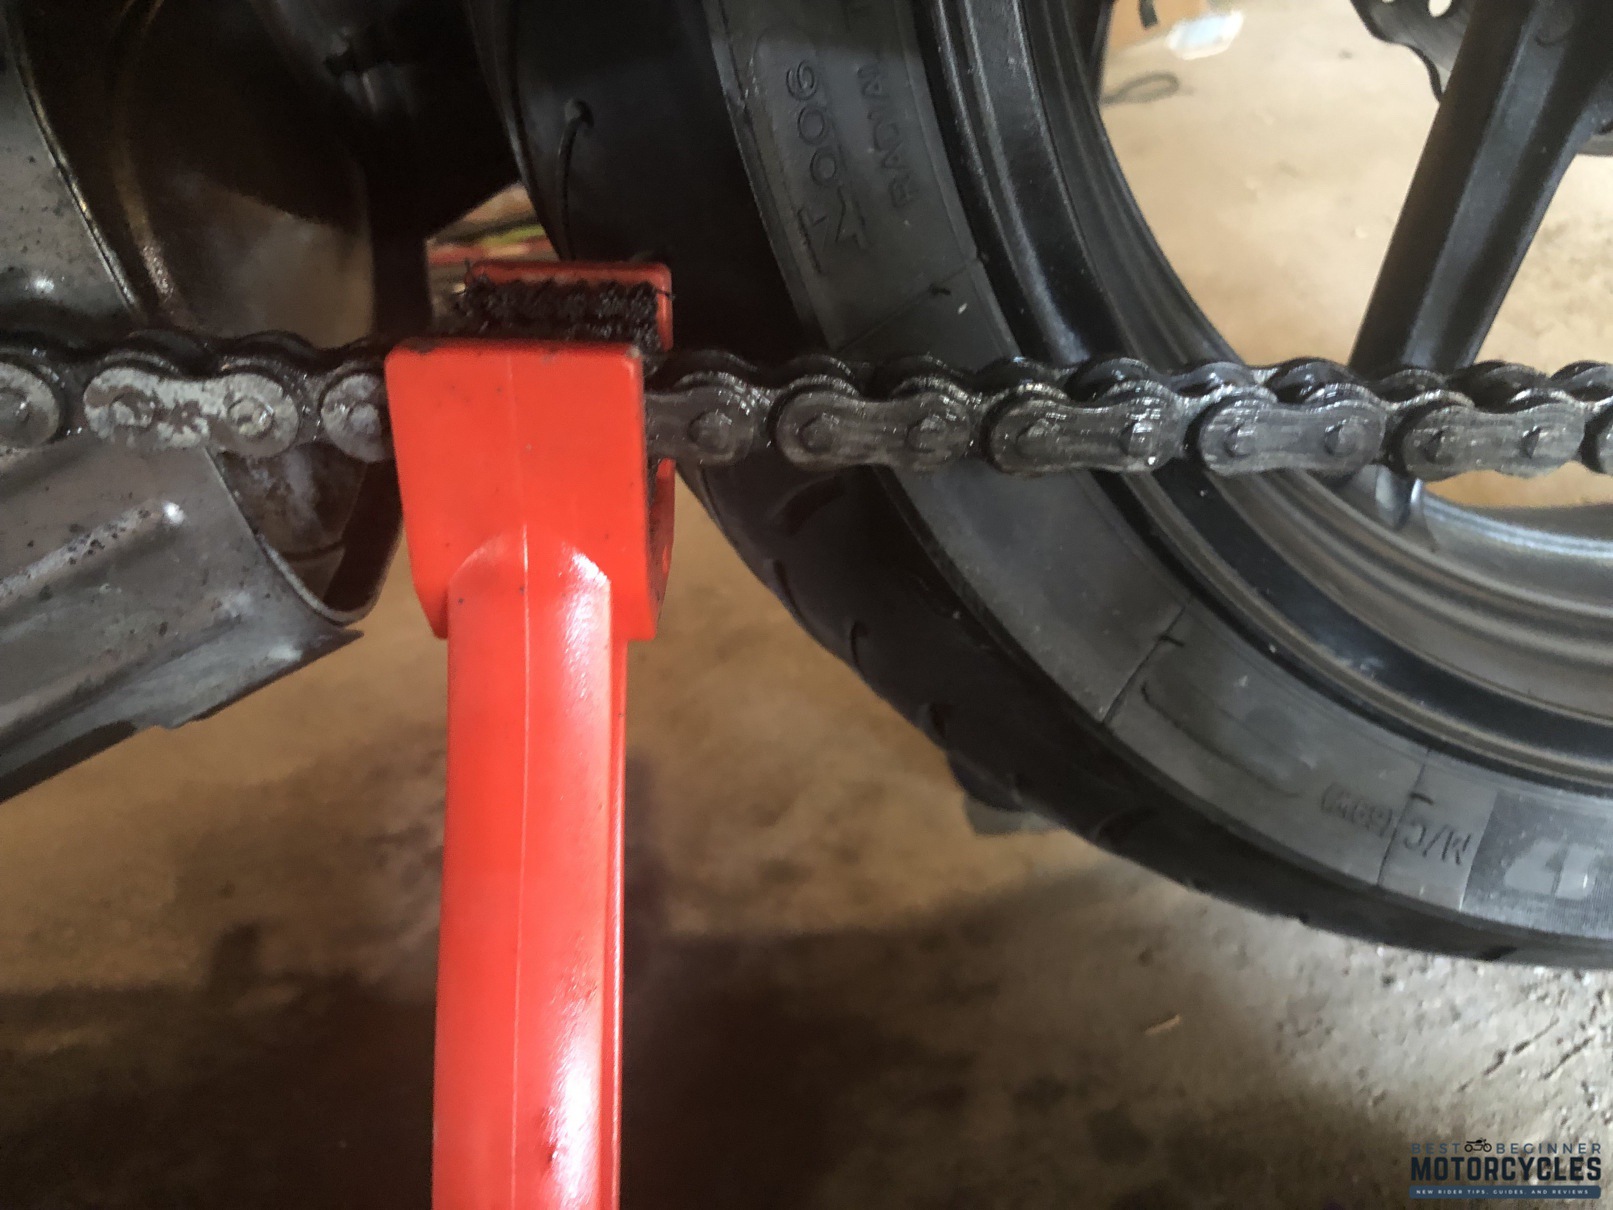
You will want to make sure you get the chain as clean as possible without needing to scrub at it. If you need to add more cleaner to do so, that is perfectly fine. Once it’s suitably clean, rinse it off gently with clean water if you have some, then wipe it dry with shop towels, a clean rag, or a microfiber cloth.
If you do not have a readily accessible source of clean water, wipe down the chain as best as you can, with the preferred tool being a microfiber cloth as they are super-absorbent. Do not use pressure washers or jet-style hose heads, as these can force water into the O-rings and could lead to rust.
The final tool you need is chain lube. Now, there are about as many types of chain lube as there are flavors of ice cream in the world, so what you use is mostly personal preference and/or recommended products from people that actually know, such as at a motorcycle repair shop or dealership service department.
Some of these lubes are almost pure oil, while others will have some oils mixed in with wax to both lubricate and then seal the chain. Once your chain is clean and dry, you don’t want to completely douse the chain in lubricant. Instead, you want a thin and even coating of lubricant, with the spray nozzle pointed at the chain and away from exhausts, wheels, tires, et al. We will reinforce that you want a thin and even coating of lubricant.
A great way to do that is if you have a center stand on your bike, or a rear wheel stand otherwise. Make sure your bike is in neutral, then use your hand to get the rear wheel spinning at a decent rate, about 3 to 5 MPH levels of rotation. You will want to lube the outer surfaces of the chain first, both inside and out, where the pins are riveted to the plates.
A good count is two to three rotations of the chain. Check the chain to make sure the lube is evenly applied, and you will want to make sure the lube is touching the pins and that it has penetrated to the inner links of the chain so they will smoothly slide against the end plates of the outer links.
Get the wheel spun up again using your hand, and this time, point the nozzle of the lube into the rollers section of the chain, or the “inside” of the chain. The same rule of thumb applies here; you want two to three rotations worth of coverage. Once again, check the chain for smooth lube application. You don’t want to have any hanging drips, nor do you want to have bare metal showing. You want a smooth, thin, glossy coat on the rollers.
If you over-lube or have hanging drips, grab your shop towels/clean rags/microfiber cloth and gently hold it wrapped around the chain. Rotate the rear wheel to wipe off the excess. This is especially important for “dry” lubes, which are the wax based type, as excess lube can grab more dirt and grime while riding and can accelerate chain and sprocket wear. You don’t need to wipe down to bare metal, as you still want that base coat of lube; you’re just removing the excess so that you bring the lube back to a thin and even coat.
Depending on the instructions for your lube, you might need to leave the lube to set, if it contains wax, or overnight, if it has penetrating oils. Make sure to read the full list of instructions on the can or the box the can came in. Follow whatever guidelines they have.
For some pure oil-based lubes, they recommend going for a short ride as soon as 15 minutes after your chain maintenance to “work” the oils into the links and cover the sprocket teeth, while some wax based lubes will state to ride like normal after 12 to 24 hours. Every situation, every lube is different, so this is one of those times that the abbreviation RTFM (“Read The Flippin’ Manual!”) pays dividends.
According to our resident off-roading expert, Jim Pruner, recommended lubricant types for the ADV and dirt bike crowd are “wet” lubes, or the ones that are almost entirely oil based, synthetic or otherwise. This is because some wax based lubes attract and embed dirt where you don’t want it. That abrasive mixture can act like sandpaper against the link seals and the sprockets.
Cleaning and lubing after a full day in the dirt and dust is highly recommended, and even if you have been mostly on the road with a little off-roading in the middle of your ride, give it a clean and lube to make sure you can enjoy even more off-roading!

During lubrication, it’s also important that you don’t get any lube on the rear tire. Either apply the lube with the spray head pointed away from the tire, or use some kind of screen like a piece of cardboard held behind the chain while you spray. Depending on the type of lube you’re using, some of them with more exotic chemicals and lubrication aids react with rubber, and can degrade the integrity of your rear tire. You also don’t want any kind of oil on your rubber, because if it sits there, the next time you ride and go to make that tight left hander you like to lean into, all of a sudden you have a slippery bit in your contact patch and you could go down.
Replacing the Chain: When & How
In an ideal world, you should be able to get many tens of thousands of miles on your chain and sprockets if you maintain, clean, and lube it correctly (as well as make sure it’s always within tension tolerances). That said, the reality is that not every day is sunny, and rain, road grime, dirt, mud, and other nasty stuff can get on your chain and cause it to deteriorate.
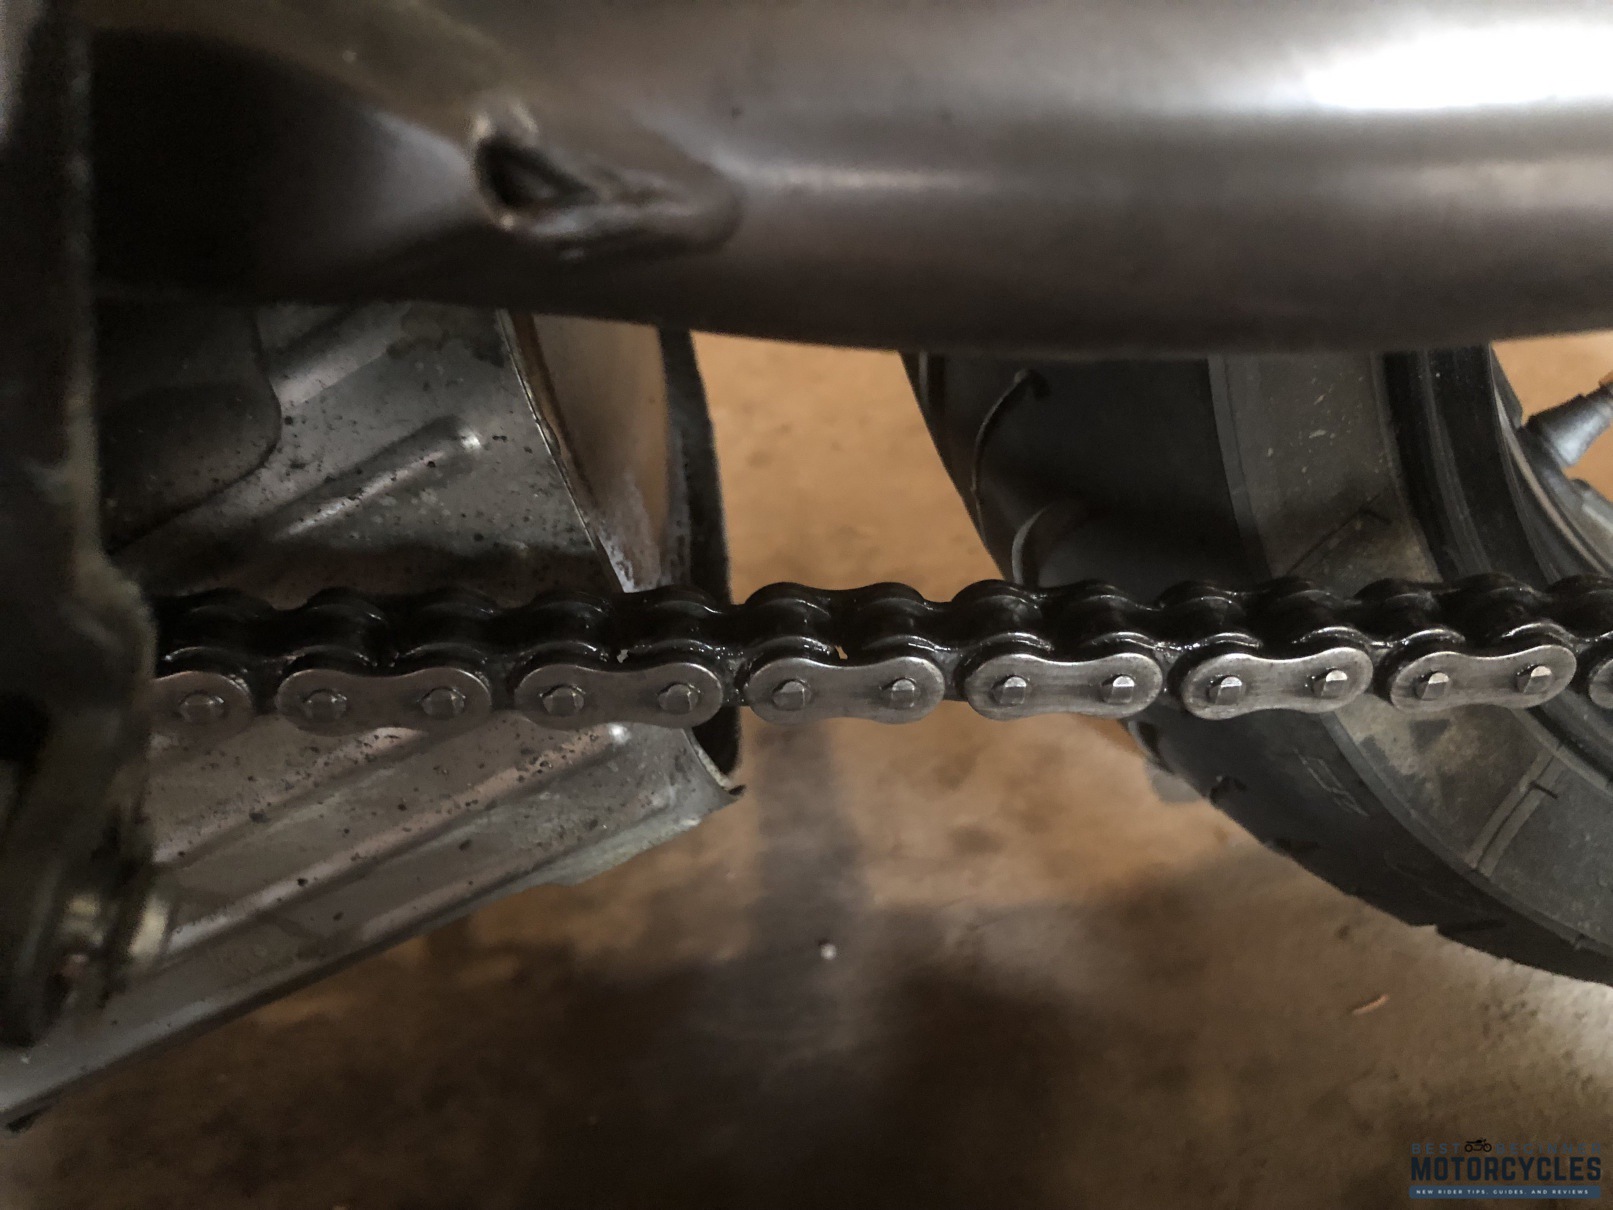
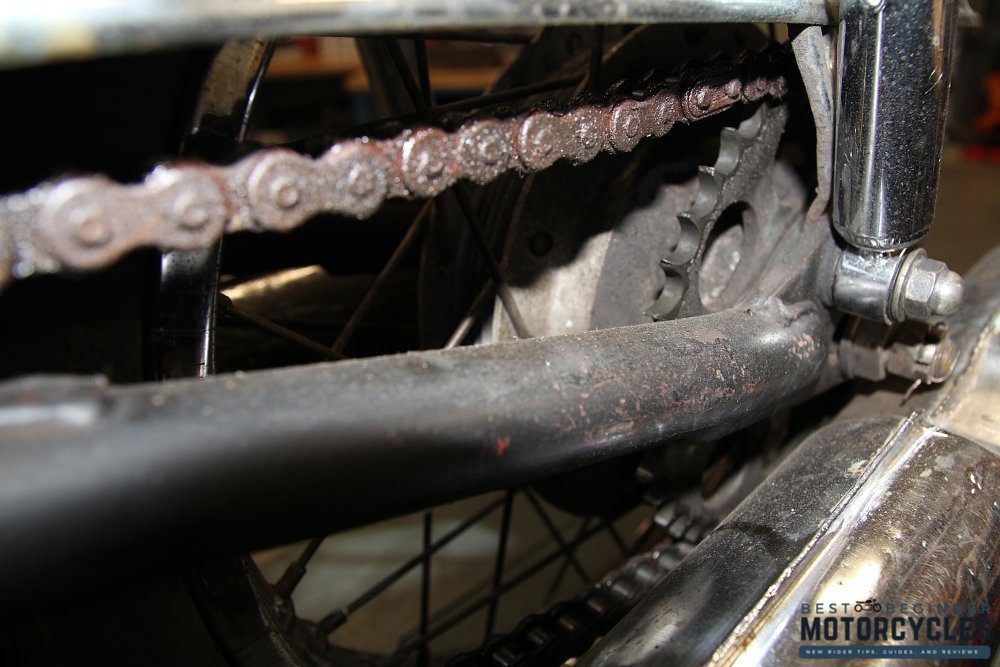
Sometimes you might not even get to 10,000 miles on a chain if you live where the air is dusty or carries some corrosive materials like salt (such as in Arizona or California). Through it all, however, the biggest sign that your chain needs replacing are binding links.
I will preface that for the image below, I used a screwdriver to intentionally make a couple of links look like their were stuck or binding, so that you can see what you need to watch out for:
Another sign that it’s time to replace the chain and sprockets is if you find that your sprocket teeth are worn down, not square or flat on the end, or the chain easily slips off the sprocket when under tension. I do not have any images of a bad sprocket, as mine is in good condition, but our good friends at RevZilla have some excellent examples.
It is best practice that even if your sprockets look to be in good repair, if you need to replace a chain, you should replace the sprockets as well. This is because these are mechanically interacting components, and a new chain on old sprockets can cause wear and tear on the chain beyond normal expectations. It might not seem like much while you’re riding, but the forces applied to both sprockets and the chain are tremendous, and an old part rubbing against a new part is not good.
In terms of costs, it seriously depends on what bike you own. For a dirt bike or trail bike, which are expected to occasionally suffer snapped chains, bent or broken sprockets from wicked wipeouts, and the like, you’re looking between $20 to $60 for a chain, and a sprocket set will cost you about $100. You can get kits for most dirt bikes that will knock that price down closer to $100 all said, but you get what you pay for.
On the other hand, if you own a BMW M1000 RR or the latest and greatest Ducati Panigale V4R, expect to be looking at a second mortgage on your home, because those are extremely high quality, exotic material sprockets and sealed O- or X-ring chains that are built to handle over 200 HP and a crapton of torque. We’re talking in the range of $200 to $400 for the rear sprocket alone, and much closer to $200 to $300 for the chain. Again, more often than not, there will be a kit with both sprockets and a chain for one price, and also at a lower total cost than buying each part separately.
Unless you are quite mechanically inclined and have all the correct tools to do so, we don’t recommend changing out chains and sprockets at home, although it is possible and many veteran riders have done it before. For a beginner, we do suggest having your bike serviced professionally, and whatever shop or dealership you use for the servicing will more than likely have chain and sprocket sets on hand for you to buy as part of the service, often at a mild discount since you brought your business to them.
