

Your motorcycle is under attack—well, at least the paint finish on it is. Rocks! Sand! Bugs! Kids whacking it in the garage with their bicycles!
Try as we might, unless your machine lives a pampered, never-ridden life (which it absolutely should not), paint chips and scrapes are par for the course.
If you’re aiming to touch up your beloved bike for the riding season, we’ve got you covered. In this guide, we’re going to share with you some basic knowledge of motorcycle paint, including how to prepare your surface for touchups and the techniques you’ll want to employ while performing these fixes. Being able to touch up paint chips is a helpful skill when maintaining your bike during ownership.
Let’s dive in!
How Exactly Are Motorcycles Painted?
For the most part, motorcycles are painted with materials and processes that are very similar to automobile finishes. Virtually all metal parts (think fuel tanks here) are painted with two coats, known commonly as a base coat and a clear coat. This is exactly what it sounds like—the first coat is the color step, and then they are sprayed with a clear coat.
The clear coat serves a couple of purposes:
- It gives the color below it depth and shine.
- It offers protection (the added physical depth of the finish makes your bike’s paint more resistant to damage).
Plastic & Metal Parts
Depending on what parts of your bike have been painted, finishes can become more complex:
Plastic parts (think most fairings here) will usually have a plasticizer added to the paint, which promotes adhesion and provides some flexibility when dry. Otherwise, the paint would simply chip off or crack whenever the part flexes.
Meanwhile, some metals require specific additives to prevent the material from deteriorating. Aluminum, for example, behaves differently than steel over time—it doesn’t rust, it corrodes! The list goes on.
DIY Fixes for Minor Chips & Scratches
So, your machine has ended up with a rock chip or small scratch. What to do, then? Minor paint repairs can be carried out by you at home!
The dirt-cheap hack that I have used to great effect over the years, is the Sharpie marker. If your bike is a dark color, you can use these permanent markers to camouflage small scrapes and chips very effectively. Light colors will be tougher to blend in this way.
If you want a more complete solution but only need to touch up very small chips or scratches, touch-up paint may be a good solution. Your dealer may be able to supply you with this, or you can buy a high-quality motorcycle paint kit online. These will often include your base and clear coats, plus specific instructions regarding application, drying time, etc.
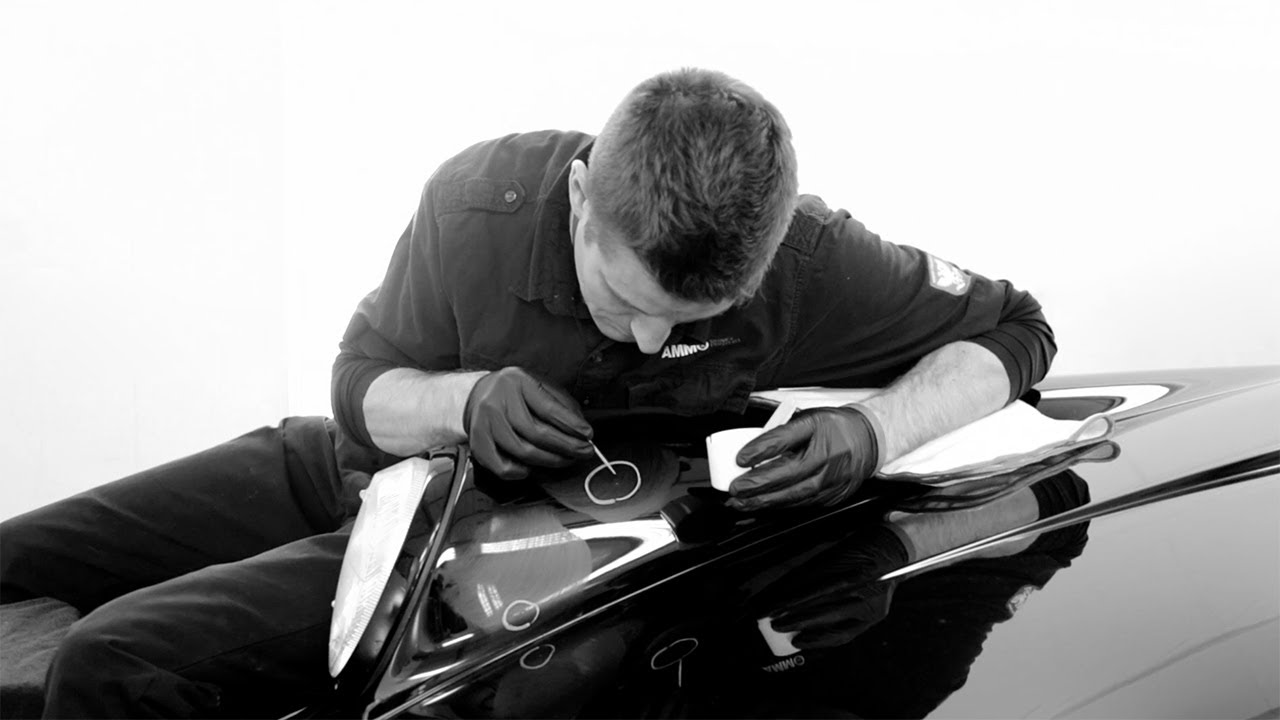
Image via THE DRIVE / YouTube
Keep in mind, though, that any significant touch-up you do with touch-up paint often leaves texture behind. Reproducing the thickness of the original finish with a brush can be tough. The color match may not draw your eye, but the texture will. That’s why you’ll have to use some special tools and techniques to achieve the results you want.
Tools & Products that You’ll Need
Of course, simply purchasing paint for your motorcycle won’t make you ready to apply it. You’ll need a few other things as well. Before you start, make sure you have the following items close at hand:
- A bucket of clean water: pretty self-explanatory.
- Sandpaper: you can’t just throw new paint on a bike—not even for touch-ups. First, you’ll have to remove the old paint from the area. You’ll also need sandpaper to smooth down the new paint once it’s on. Generally, it’s good to have the following grit levels available:
-
-
- 80
- 400
- 600
- 1500
- 2000
-
- Lacquer or wax polish: this will help you make the area you’ve worked on look shiny and new after the touch-up coat is applied.
- A variable-speed polisher: one of these, equipped with a buffing pad, will make polishing your bike much easier once the new coats are on and have dried.
You should be able to pick up all of these items at your nearest hardware store. Then it’s just a matter of knowing how to use them!
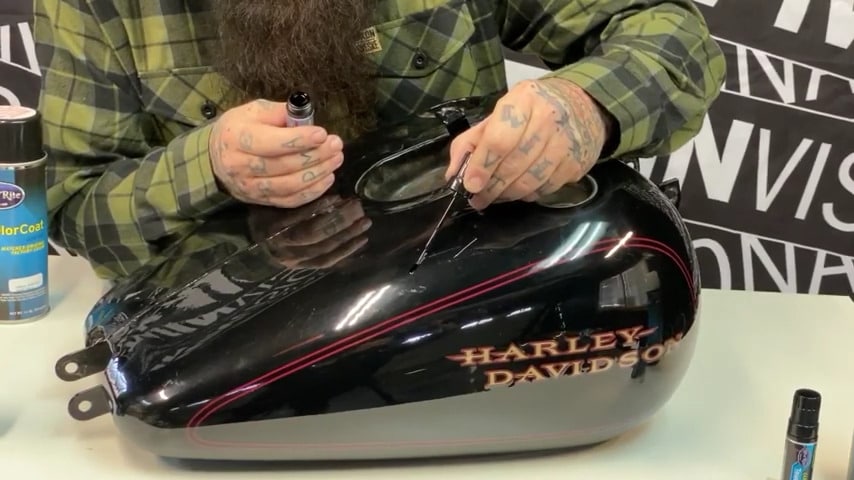
Via vtwinvisionary.com
Step-by-Step Guide
Touch-up paint is sold in tubes, with a brush attached to the cap. It’s designed for easy application—just dip and dab—but you’ll still want to follow a few steps to ensure the end result looks good.
#1: Clean Your Bike
before applying any touch-up paint, make sure the spot to be painted is perfectly clean and free of any dirt or grease. The best way to do this is by using a dedicated motorcycle cleaner, a damp microfiber cloth, and a buffing pad to remove dirt and grime from the chipped or scratched area.
If you have the mechanical know-how, you may also want to consider removing the specific part of the bike you’re touching up before starting. This will help you access it more easily and place it in such a way that the paint can dry between coats without being disturbed.
#2: Remove Old Paint from the Area
Before applying the new paint, you’ll want to use fairly rough sandpaper to remove the old paint from the area. Start with your most coarse grain (80) for the edges of the chip and use slightly finer grains (400 and 600) to clear the area. Go gently so you don’t start sanding away the metal underneath.
#3: Prep the Touch-Up Tube
shake your touch-up tube of paint thoroughly before you open it. This will ensure that the paint is mixed properly, and prevent it from coming out in blobs that create an uneven area on your bike.
#4: Go Slowly
It’s not just good riding advice; it’s good painting advice too! Applying your touch-up paint carefully and slowly will help you get it onto the bike evenly and prevent you from adding your next coat before the last one is dry. Slopping additional paint onto an area that hasn’t dried yet will cause the paint to dry in blobs, giving your bike a texture you more than likely don’t want.
#5: Lay It on (Slightly) Thick
This part’s important: you’re going to put the paint on in layers, and you’re going to go slowly. You want the paint covering the chip or scratch to be slightly thicker than what’s on the surrounding frame, because you’re going to have to sand it down afterward to make it smooth. As always, wait for the paint to dry before putting on the next coat. Be patient!
#6: Sand & Polish
Use sandpaper with fine grit (1500 or 2000). Make sure it’s damp first, and wrap it around a block of wood so that it makes contact with the frame of your bike evenly. Then rub gently until the touch-up paint is flush with the bike’s original paint—or close to it. Don’t sand down too far, though—you don’t want to have to reapply the touch-up paint.
Once that’s done, apply some wax or lacquer and polish to your heart’s content! Remember, though, different touch up paints will apply and dry differently. If this is the first time you have done this, consider finding something suitable to practice on first.
Helpful Tips
These might seem basic, but you’d be shocked by how many people don’t think about them until it’s too late. If you want to make touching up the paint on your bike easier and avoid errors, keep the following in mind:
Avoid Wind & Rain
You obviously shouldn’t paint somewhere so enclosed that you’ll be inhaling paint fumes (trust us, it’s not as fun as it might sound), but you don’t want too much exposure to the elements either. Try to paint on a day with nice weather—and if you can’t avoid wind, put the bike behind a wall to prevent the paint from being distorted before it dries.
Keep the Lights On
Painting in the dark just isn’t a good idea. You need to see what you’re doing. You also don’t want the lighting you’re using to cause too many shadows, as these can make it hard to see what you’re doing clearly and lead you to make mistakes. We recommend setting up a bright overhead light and using light stands on either side of the bike as fillers.
Protect Each Coat as It Dries
The new paint will be at its most vulnerable when it’s drying on your bike between coats, so it’s not a bad idea to hang a tarp or plastic sheets around the bike while you’re waiting. Just don’t put them too close—you don’t want them making contact with the paint and ruining the texture.
Via webbikeworld.com
I’m Trying to Fix Significant Damage—What’s Next?
If you’re dealing with significant chips, deep scrapes, or damage to the bodywork, you have moved beyond the realm of a typical touch-up repair. Typically, anything deeper than a shallow chip to the paint needs professional attention—and may require the damaged part to be repaired or replaced outright. This is because exposing the metal underneath the paint on your bike to the elements can lead to corrosion and eventual structural damage.
If the chips or scratches on your bike are the result of a drop or an accident, it’s worth taking your motorcycle to your dealership or mechanic to have it assessed. They’ll either tell you you can fix it yourself or that more work is needed.
A good first step up for this is to get the materials you’ll need for a finish you can be proud of. Using bespoke motorcycle paint products takes the guesswork out of getting what you need. Practicing the sanding technique really helped me. You could even pick up any part at a salvage yard made of similar material and practice there before starting to sand your own bike.
Paintwork is not some arcane art. Much like bike customizations, it is an acquired skill. Remember the things that were so difficult as you learned to ride that are now second nature? You can do this!
